

Alienware AW3926QW Review: The Ultimate 39-Inch 5K OLED Gaming Monitor


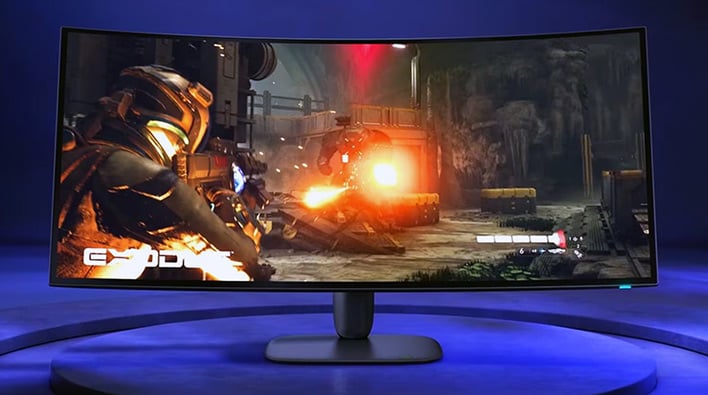
| Alienware AW3926QW Ultrawide WOLED Gaming Monitor: $1,099.99 With a 5K ultrawide resolution, 165Hz refresh rate, 330Hz dual-mode support, 1300 nits peak brightness, perfect OLED blacks, excellent WOLED text clarity, G-SYNC and FreeSync support, and robust connectivity options, the AW3926QW is one of the best choices for gamers.
|
|||

|

 |
||
Sometimes, when reviewing technology products, you get sent something that you don't really like. Other times, you get something that you do really like despite some flaws. Very rarely are you reviewing a product that you're so enamored with that it takes weeks to gather coherent, useful thoughts about it, yet that's where I am with the Alienware AW3926QW OLED gaming monitor.
Is it the Alienware AW3926QW perfect? No. There are things about it that could be improved. It may well be just about as close to perfect as exists on the market right now, though, at least for my personal use cases. This is an absolutely brilliant gaming monitor that gets top marks in nearly every category, and has tons of features that I'm going to go over in detail, on the pages ahead.

Here's the short version: this is an ultrawide, high-refresh-rate HDR OLED gaming monitor with a 5K2K (WUHD) resolution that has no real weak points. There's no text fringing, there's no clumsy power brick required, there's no irritating cooling fan noise, there's no "gotchas" with the ports, there's nothing misleading about the HDR specs. It's an insanely bright HDR OLED gaming monitor with immaculate image quality, flicker-free VRR, and a "what you see is what you get" feature set.
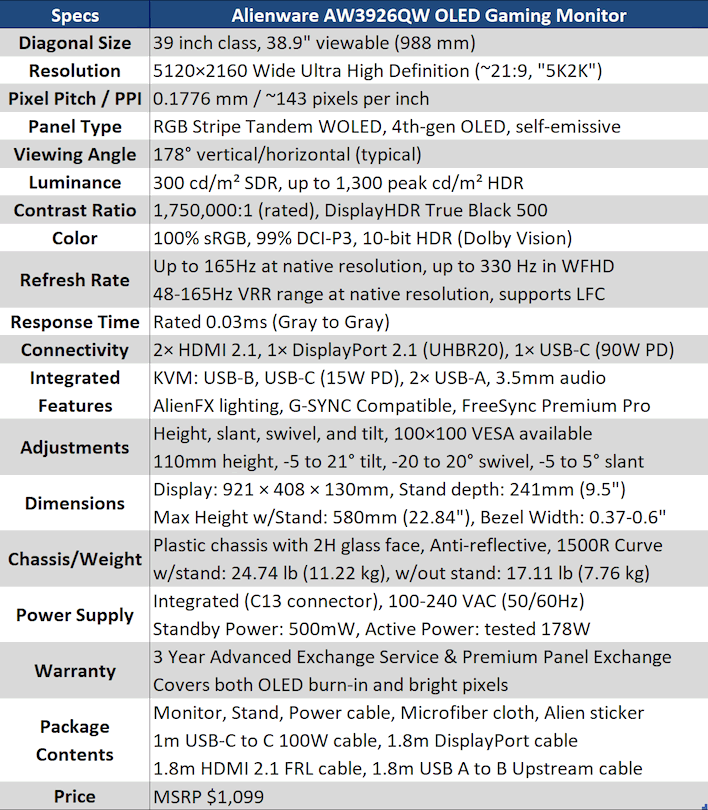
If that's all you need need to know, then by all means, head to Dell's website to order one; it's available now. There are a few curious quirks about this monitor that you might want to be aware of before you do, though. Read on, and I'll tell you all about them. But first, let's check out the actual specifications:


This is an exaggerated case because I'm pointing one of my bright camera light boxes directly at the screen while rotating the monitor to point at it, and you can still see what's on screen, so it does have some anti-reflective technology. Still, don't grab this monitor thinking it will be flawless in a very brightly-lit room or especially a naturally-lit room. It really wants a darkened gamer cave to show off its true power. That's not to say that it's not bright, though.

Check out how relatively dark the room lighting looks when I photograph the monitor in HDR mode. The camera has to adjust its exposure so much to compensate and photograph the screen clearly that the room looks like I turned off most of the lights. To be clear, this is with all of the lights in the room turned on, and GTA V doesn't even natively support HDR output; I'm using NVIDIA's RTX HDR here to achieve an HDR presentation.
When using the Windows HDR Calibration tool, the test measures a brightness of 1270 nits for both small screen areas and full screen brightness. That's unusual, and you won't see that normally; in games and videos, super-bright HDR highlights are normally reserved for smaller portions of the screen while the rest of the display is at a more normal brightness level. I measured a brightness of 224 nits on the desktop (with a lux meter) while in HDR 1300 mode, but I'll talk more about the HDR modes on the next page.

One of the major frustrations with using OLEDs for desktop PC monitors has been that historically they have used optimized subpixel layouts that offer perfectly acceptable image quality in films and TV shows, but are generally not great for text-heavy PC games or desktop use, as they can introduce distracting color fringing. The AW3926QW uses one of the new OLED panels with an RGB stripe subpixel layout, and as you can see above, there is absolutely no text fringing. In fact, text is perfectly clear, just like with an LCD. It looks great, despite my shoddy photography skills.
In addition to being an RGB stripe OLED, this is also a tandem OLED, which is what allows it to achieve such stunning brightness. It's impossible to truly demonstrate the brightness of an HDR monitor using SDR photographs, but see the GTA V picture above for an illustration that could give you some idea.
Enough yapping about the thing; let's do a little walkaround and talk about the physical properties of the AW3926QW.
Alienware AW3926QW Chassis, Stand, And Ports

You've already seen the front of the AW3926QW, but here it is in different lighting. Hopefully this photo gives some idea how dark the monitor gets when pixels are black. Like any good OLED, it's simply impossible to tell if the monitor is actually on or not when the screen is black. During interstitial loading screens in games, or when rebooting the PC, the monitor just looks like it's off aside from the power LED on the bottom.

Around the back of the monitor you can see the AlienFX-controlled RGB LED alien head logo, a strange bit of alien script on the right side, and the elliptical ring that serves as a massive cooling vent. Despite drawing significant power (I verified 178W under HDR 1300 operation; Dell rates it for 360W maximum) and thus having active cooling, this monitor is completely silent, likely thanks to that big ol' cooling vent around the back. Otherwise there's not much to see from this angle besides the cable management built into the stand. Let's get a better look at that.

This close-up gives you a pretty good view of the stand and the pass-through cable management. I really like the way this was done; it's big enough to easily pass thick DisplayPort, HDMI, and power connectors through while oriented just perfectly so that the wires don't stretch unduly if you move the monitor up and down. Alienware's experience in monitor design really shows here. The stand is ridiculously easy to attach and set up, by the way.

Removing the stand and looking underneath you can see the four screws for adapting third-party VESA mounts, although Dell and others sell arm mount adapters that snap in toollessly, the same as the stock stand. You can also see just an incredible pile of regulatory information as well as a long sentence in alien script. Good luck deciphering that; I spent about 3 hours on it with the help of Gemini and ChatGPT and got nowhere.
Down below you can see the sticker with the serial number, service tag, and manufacturing information as well as the control stick there at the very bottom. You can also see the labels for the connections. Oh, and that big plastic button there is to release the stand.

Moving the camera around to photograph the underside of the screen, there are two main things to see. The first are the plugs; you can see the C14 receptacle for the power cable, the dual HDMI 2.1 ports, the DisplayPort UHBR20 connection, and the USB Type-C cable. I primarily used HDMI and USB Type-C for my testing. Notably, when connected with USB Type-C, as long as it's a full-featured (read: Thunderbolt or USB4) port, that single cable provides display connectivity, audio connectivity, and USB pass-through for the two Type-A ports, the pass-through Type-C port, and the headphone jack. You only need the USB Type-B plug if you're using HDMI or classic DisplayPort.
It is here that we come to one of my criticisms of this monitor, which is that there are no markers or guides of any kind to help you 'find' the ports, and the thick plastic of the casing doesn't help here, either. While plugging in power is trivial, the other connectors, particularly USB Type-C and the back-side Type-A port, are a pain to get seated. That USB-A port over on the right in the photo above isn't some kind of diagnostic port, it's a full featured USB-A 5Gbps connector, so you'll likely want to use it. The ports on the bottom edge are obviously easier to get to, and easier to plug things into, especially considering the way the chassis is recessed to help. The monitor doesn't tilt backward very far, so you're basically stuck laying the monitor over to safely plug things in. Not the end of the world, but tedious when the thing weighs 25 pounds.

This photo gives you some idea of the thickness of the monitor. It's pretty significant. It's nowhere near big as our old CRT monitors, of course, and the stand itself is actually deeper than the rest of the monitor at 9.5". But if you're used to half-inch-thick LCDs, this is considerably beefier than that. That dark slot in the photo is the aforementioned cooling vent; make sure it doesn't get too dusty, as heat kills OLEDs quick.
And with that, you've pretty much seen all there is to see about the exterior of the monitor. On the next page, I'm going to spend some time talking about the monitor's OSD, but don't skip over it, because I'm also going to talk about the features controlled by the OSD, so read on if you want to know more...