Flip UltraHD Pocket Camcorder Review
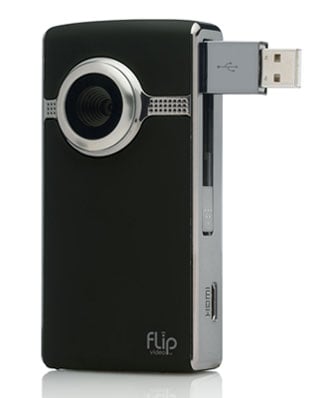
The Flip UltraHD is available with a black or white body. We looked at the black-colored model, with its front, back, top, and bottom covered with a black, rubberized plastic. The sides of the unit are covered with a silver-colored, metalized plastic. Despite the plastic body, the camcorder appears to be sturdy--although we'd be hesitant to see what would happen to it if we dropped it. The 4.25x2.19x1.17-inch, 6-ounce device, felt comfortable and light in our hands, and never felt slippery--even when our hands became sweaty from holding it for long periods of time.
The front of the camcorder contains a fixed-focus (1.5m to infinity), fixed-aperture (f/2.4) lens. (The Flip UltraHD comes with a cloth carrying case that does double-duty as a lens cloth.) Next to the lens is a grill that covers the built-in microphone. A recording light, hidden behind the grill, lights red when the camcorder is recording.
The entire front section below the lens, slides off to reveal access to the removable battery. You could swap in a second rechargeable battery or even a pair of traditional AA batteries to extend the camcorder's recording time beyond the battery's rated 2.5 hours. The bottom of the camcorder houses the lock for the battery compartment, as well as a tripod mount.
The back of the Flip UltraHD contains a 2-inch LCD, speaker (above the LCD), and the camcorder's controls. The LCD is the only means of viewing what is being recorded, as the camcorder does not include an additional optical viewer. While small, the LCD is bright and sufficient for monitoring what the lens sees. Typically, when you use the Flip UltraHD, you use the camcorder with your arm extended out in front of you. When recording, the LCD shows how much recording time is left on the device.
The controls are easy to use and very basic, providing only record, stop, and zoom functionality during video recording. The big red record/stop button in the middle makes starting and stopping recordings a no-brainer. Pressing the dedicated playback button automatically plays back the most-recently recorded video. During playback, you can raise and lower the playback volume, fast-forward and rewind through a clip, advance through multiple saved video clips, and delete saved clips. If you press and hold the red record button when you power on the device, it takes you to the setup menu, where you can set the camcorder's date, time, enable or disable tones (which are the beeps the camcorder emits when doing things like starting or stopping recording), and enable or disable the red recording light.
 |  |
| The built-in, flip-out USB port is very short. | Spending a few bucks on a USB extension cable makes connecting the Flip UltraHD to a computer much easier. |
One side of the camcorder has the power button and a receptacle for the included wrist strap. We were able to go from powering on the camcorder to start recording a video in about three seconds. The other side of the device contains the USB interface and an HDMI Mini TV-out port. The USB interface is attached to an arm that swings out when you press a release button. The arm is less than an inch long, however, which makes it quite challenging to connect to the USB port on many computers. We used a USB extension cable to make connecting the camcorder to our computer a much less cumbersome process. We had to supply the cable ourselves, however, as the Flip UltraHD does not come with such a helpful item. If you want to display the Flip UltraHD's saved videos on a TV or monitor, you will need to get your hands on an HDMI Mini-to-HDMI cable or adapter.
 |
| We encountered this overheating message a number of times when the Flip UltraHD was charging. |
We also ran into a problem when charging the Flip UltraHD. A number of times while charging the unit, the camcorder's LCD displayed an error message saying that the unit was too hot and charging was halted. We found that charging would not automatically continue once the unit cooled back down; and instead we had to unplug the camcorder's USB connection from our computer and then reconnect it in order for charging to continue.


