EVGA XR1 Review: Full-Featured High Quality Stream Capture
In particular, our goal was to stream Destiny 2 which is notorious for not playing nicely with livestream software. Destiny 2 does not support the direct Game Capture features of OBS and Xsplit, so we must use either Display or Window capture (we went with Window) which are more resource intensive. We played with graphics settings on the Medium preset for the best balance of appearance while conserving system resources for encoding. We used our monitor’s native resolution of 2560x1440p for gameplay which is then scaled to a 1080p recording.
We tested game capture in a variety of ways. Twitch.tv specifies a maximum bitrate of 6000kbps for 1080p60 footage, so that was our primary target. All recordings were performed using the x264 software encoder at various presets. When the bitrate is capped at 6000kbps, the only real option to improve quality is to use a higher-quality (slower) encoding preset. Slower presets do run the risk of dropping frames, however, so there is an upper limit to a particular system’s capabilities.
We tested three setup scenarios:
- Case 1: Destiny 2 on Test System with OBS on Test System capturing via Window Capture
- Case 2: Destiny 2 on Test System with OBS on Test System capturing via EVGA XR1
- Case 3: Destiny 2 on Second System with OBS on Test System capturing via EVGA XR1
For each test, we ran through the Kingship Dock Lost Sector of the Tangled Shore. We overlaid OBS statistics on each recording to highlight CPU Usage, average time to render frame, and whether or not there are skipped frames due to encoding lag. Our observations are based on the source recording before any YouTube recompression.
x264 Very Fast Preset at 6000 kbps
Up first, we tested with the most common starting point for streamers, the x264 Very Fast preset at 6000kbps. Visually, all three cases are very similar with zero frames skipped. We would rate the image quality as decent, but it is not without issues. Any part of the recording with particularly frantic action becomes rather blocky. In addition, colors appear somewhat desaturated.While the end results are indistinguishable, there are some very minor differences in the OBS stats. Our third Case with separate Gaming and Encoding systems shows the fastest frame render times, each landing under 1.2ms with most occurring in 1.1ms. CPU usage also hovers around 22-23% for most of the run. Case 1 with direct capture performs second best. The average time to render a frame varies more between 1.1 and 1.5ms, but for the most part the average holds to 1.2ms or so and has a CPU usage of around 30%. Case 2 has the slowest average time to render frame which mostly falls between 1.4 and 1.5ms with similar CPU usage to Case 1’s direct capture.
x264 Very Fast Preset at 18000kbps
Before moving on to other encoding presets, we first tripled the bitrate to 18000kbps. While slower encoding presets can help quality, the is no substitute for raw bitrate, which folks more interested in recording footage will want to keep in mind. Of all our configurations, this is the best looking result regardless of Case. Footage looks almost indistinguishable from actual gameplay with minimal artifacts. The higher bitrate does require more system resources with all cases increasing their CPU usage by around 10%. Both single-system Cases see average frame render times spike to 2.0 ms regularly, while the two system configuration holds a near constant 1.2ms.x264 Fast Preset at 6000kbps
Back at 6000kbps, our other option to increase quality is to bump up the quality of the encoder. Moving from the Very Fast to Fast preset should reduce the amount of blocky artifacts we see. The Fast preset is where the two system setup begins to shine. Both of the single-system configs see substantial frame skips which reduces the ultimate quality of the footage. The two system setup remains smooth with similar frame render times to the 18000 kbps Very Fast preset. The video still shows some signs of blocky artifacts, but is significantly improved from 6000kbps on the Very Fast preset.x264 Medium and Slow Presets at 6000kbps
Out of curiosity, we continued to test our two system setup with higher quality encoders. The x264 Medium preset shows some minor regressions from the Fast preset as our Intel Core i7-8700K reaches its limits. The bitrate shows more fluctuations with action sequences and it begins to drop a few frames, amounting to 0.3% by the end. Moving the next notch up to Slow has the footage completely fall apart with more than 80% of frames getting skipped.Keep in mind, the EVGA XR1 is only acting as a raw camera feed here. The encoding quality you can achieve will be limited by your processor’s capabilities so your results may be better or worse than ours. At any rate, using a dedicated system for encoding via a capture card can often yield significantly improved results.
The encoding system does not need to be a desktop, either. The XR1 can be connected to a laptop to handle encoding just as easily via the USB interface, provided the notebook has enough processing muscle. The encoding system’s GPU does not even particularly matter since we are using CPU-driven x264 encoding.
EVGA XR1 Final Thoughts and Conclusion
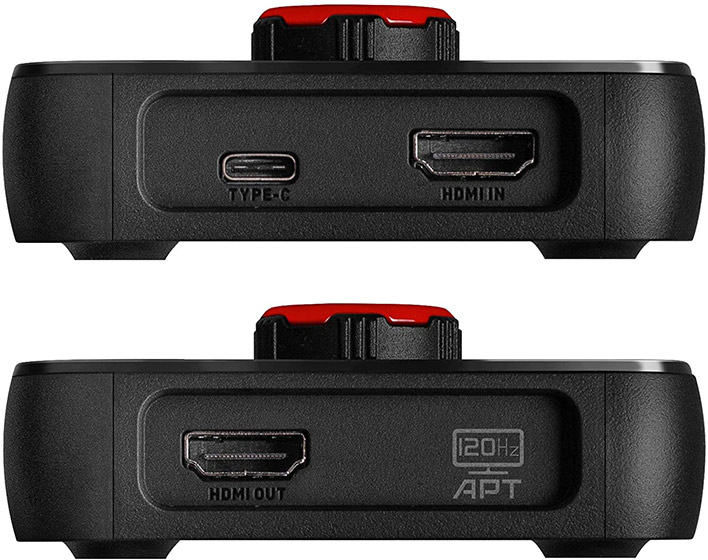
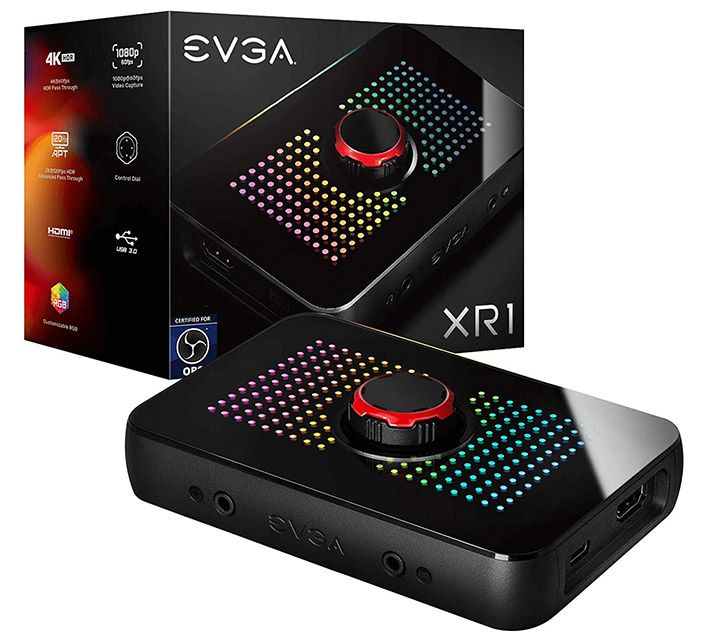
HDMI capture cards are incredibly useful tools for the right applications, and the EVGA XR1, which is currently discounted to $99, is no exception. While we did experience some hiccups here and there, the fact of the matter is that most of these issues are present with any capture card on the market. In that light, the EVGA XR1 should be viewed as a 1080p60 capture card which does its job very well and has some added flexibility to support higher resolution sources if needed.The EVGA XR1 becomes more interesting when its Advanced Pass Through mode is considered. With many lesser capture cards, users are locked to 60Hz for as long as it is connected. In order to take advantage of a higher refresh rate display while not capturing, users would need to reconfigure their connections. Not only is this annoying, but it may lead to not using the capture device nearly as much in the long run. With the APT toggle, however, switching modes is really as easy as holding down a button. While still limited to 120Hz, it is a significant improvement over other similar devices that must be considered.
On a more practical note, managing two computer systems simultaneously while managing a stream can be unwieldy. With two keyboards and two mice, it is also easy to run out of desk space. To help with this, you could turn to a physical KVM switch, but we found Microsoft's Mouse Without Borders utility to be incredibly useful and intuitive. Once installed, we recommend utilizing the keyboard shortcuts to toggle between systems rather than letting the mouse wrap at the screen edge. For FPS games in particular, this tweak is a necessity. We should also note that mouse wrapping can be toggled on or off with another keybind as well.
Whether the EVGA XR1 can improve your stream's quality or not is ultimately up to your system's capabilities, but it certainly can't hurt. With our test system, the XR1 allowed us to significantly improve encoding quality at 6000 kbps by offloading the game to another machine. The device's Advanced Pass Through mode, easy to use controls, and flexible audio input options also set it apart from most other USB capture devices. If you're looking to up your streaming game, we certainly recommend giving the EVGA XR1 a closer look.

|
|

