Behold The Sweet Rock Pi X Powered Serene Screen Aquarium And How To Build One
Build Your Own Tiny, Digital Aquarium With Serene Screen And The Rock Pi X

Serene Screen’s combination of beautiful fish and technology instantly had me hooked. I even joined the official fansite – of a screensaver. Suddenly, it’s 20 years later and only a few of us diehard fans (and Jim Sachs himself) still congregate in those hallowed forums. It may be true that “nobody buys screensavers anymore” but we’re still linked by a friendship catalyzed by long-term fandom. Ultimately, that makes Serene Screen more than just another piece of software to me and that’s where this fish tale earnestly begins...
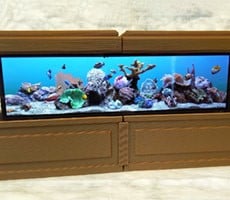
See It In Action, Then Learn How To Build This Awesome Digital Aquarium Below
The Hardware And Display
Now that you are up to speed on a couple of decades of relevant personal history, let’s roll back the clock a couple of months to when I first ran across the awesomeness that is the HSD088IPW1-B00, an 8.8” 1920x480 IPS LCD. Most listings for the screen include a HDMI-HSD8B-V02 driver board, which accepts Mini-HDMI input and Micro-USB for power. I knew instantly that I needed to use this $65 combo in a project, and it didn’t take long to decide what I wanted to build.
The Rock Pi X Single Board Computer
The size of the screen gave me a rough idea of the overall footprint of the build. There wasn’t going to be much room to work with. Thankfully, Serene Screen’s system requirements are extremely low. We’re talking about a program that made RIVA TNT and ATI Rage chips sweat back in the day, but hasn’t changed much since. Even the slightly more demanding 2008 version ran decently on Y2K’s GeForce 2 MX. It was obvious that any semi-modern IGP could do the job, but the smallest PC I had laying around was a Haswell-based NUC. The actively cooled 15-watt chip inside that unit was quite simply overkill.Enter the Rock Pi X, the result of searching for an x86 PC in a Raspberry Pi form factor. These little guys hit the scene late last year and purportedly packed the perfunctory punch to push the aquarium’s pulsating pixels. The Rock Pi X is based on 2016’s Intel x5-Z8350 processor. You may know it better as a 2-watt quad-core Cherry Trail Atom chip. Its base clock is 1.44 GHz and it can burst up to 1.92 GHz. The Intel HD Graphics inside have a 200 MHz base frequency and can burst up to 500 MHz. I believe that was called “good enough” once upon a time.

The Pock Pi X can be had for as little at $50 if you don’t mind 1GB of memory of 8GB of eMMC storage. Since I intended to run Windows 10 on it, and I’m not a masochist, I ordered the 4GB model with 64GB of storage for $85. To save a bit of money, and because I still needed the time to design and print the enclosure anyway, I ordered my Rock Pi X directly from the manufacturer-recommended reseller ALLNET. It took a little over three weeks to arrive. The Rock Pi X requires a power supply that supports the USB PD 2.0 specification. So, despite the pedestrian looking USB-C port, it needs to be fed with at least 9V/2A of juice. I ordered a compliant 45-watt power supply and a one-meter USB 3.1 cable from ALLNET as well.
The Design And Build
With the technical aspects of the project sorted out and the primary components in transit, it was time to work out how to turn a bare LCD and diminutive motherboard into something that resembled an actual aquarium. I scoured Amazon for the perfect combination of project box and “aquarium glass” and settled on this acrylic napkin holder as the enclosure for my build. The napkin holder was a little wider than the screen required, but I really didn’t want to make it myself and it ended up working out extremely well.As soon as my “case” arrived, I busted out my calipers and put my fundamental parametric modeling skills to work in Fusion 360. I briefly considered design options that would attempt to hide the digital nature of this, uh, digital nature, but I was much happier with concepts that embraced it instead. I soon created printable two-piece stand and hood designs that would frame the LCD in the top half of the acrylic box when it was positioned on its side. Anyone who can sketch, extrude, and chamfer in any CAD software could easily recreate or transcend my design, but I’m freely sharing the fruits of my labor for those that may want to simply print their own.

At this point, I got a small taste of what the folks that design real computer cases must go through. Holes for standoffs needed to be precisely located, while keeping in mind that the position of the boards would dictate what cables I would need to get everything connected. I also needed a spot to mount the tiny Wi-Fi antenna that comes with the Rock Pi X and needed clearance for the passive heatsink I intended to employ. Most critically, the fragile ribbon cable connecting the LCD to the driver board needed to be bent and torqued as little as possible. Suffice to say, that after a few test-prints I ended up with a flexible solution that even features a removable motherboard tray.

A few quick details on the actual prints. I used a Prusa Mini with a big 0.8mm nozzle and 0.4mm layer heights to knock out the parts quickly and because I wanted to see the layer lines as part of the aesthetic. No supports were necessary, and the only post-processing required was a little cyanoacrylate glue to hold the halves together. For the external parts, I used AMOLEN brand wood filament, which I’ve had good luck with in the past. Multi-part test prints came out quite stringy, probably due to difficulty cooling such a large diameter wood-filled extrusion. The stringing persisted even when I lowered the nozzle temperature significantly, so I printed each piece individually to mitigate issue. For the internal brackets, I used iSANMATE black PLA because it’s cheap and has worked well for me previously. I should note that the printed shapes are quite simple and could easily be cut and shaped out of wood, polystyrene, or other material you may prefer to work with, if you don’t have access to a 3D printer.
The Initial Assembly
With all the parts printed and overall fit confirmed, it was time to figure out exactly what other bits and bobs I needed to procure to finish the build. The CAD model already accounted for the height of the Rock Pi X and LCD driver board when attached to their respective M3 and M2 standoffs. The model also included a box representing the heatsink I had picked out in advance (which was simply adhered to the Rock Pi X with thermal tape). However, until all those pieces were assembled, I wasn’t exactly sure what cables would be best to connect the two boards together.
This 6” HDMI to Mini-HDMI cable, with a left-angled Mini-HDMI plug, proved to be the perfect fit. I had to piece together the USB connection from two short cables because I couldn’t find a single cable to do the job, though. This 6” Micro-USB cable comes straight out of the LCD driver board because there wasn’t room for a 90-degree plug. I plugged that cable into one of these angled extension cables coming out of the Rock Pi X. I used the leftover 90-degree USB extension to provide easy access to another port on the board. And with that, the build was complete.
For those keeping track, the parts and accessories used in this build included:
- Rock Pi X Model B (4GB/64GB)
- HSD088IPW1-B00 8.8" 1920x480 IPS LCD and driver board
- 6" Micro USB cable
- Left/right angle two-pack USB extension cables
- M2 and M3 standoff kit
- Thermal conductive adhesive tape
- 1.48" x 1.44" x 0.93" heatsink
- Left angled 6" HDMI to Mini-HDMI cable
- AMOLEN dark wood walnut PLA filament
- Feoyoho acrylic napkin holder
Fiddling And The (Hopefully) Final Install
I installed Windows 10 with the Rock Pi X connected to a more traditional screen. The display supports EDID, but that didn’t help me when I needed to access the BIOS and change the boot device to my install media. So, I used a separate monitor until the OS was installed and the entire process was as unremarkable as any Windows installation. There were still drivers to track down, but at that point I couldn’t wait any longer, I had to hook the Rock Pi X up to the odd-ball screen and see if they actually played nice together. I was practically giddy when I was rewarded with the strangest and, dare I say, cutest looking desktop I had ever seen.
What comes next may save you some time if you ever decide to install Windows or Linux on a Rock Pi X of your own. I ran into a couple issues when installing the Wi-Fi and display adapter drivers and the fixes I found are below. If you’re plugged into Ethernet, let Windows Update do its thing first. Then hit up the driver archive provided here and install all the remaining unknown devices in Device Manager. Nothing unexpected so far. When you’re done though, you’ll most likely find that the Wi-Fi device won’t start, here’s the solution that worked for me in Windows. In Linux, you’ll want to follow these steps to get Wi-Fi working.
The onboard Intel HD Graphics, the most critical component of making 20-year-old hardware-accelerated fish swim around, is where things get a little dicey. As I write this, I’m still working though some issues that cause instability in Windows. I’ll dive deeper into that shortly, but the good news is that running Serene Screen around the clock works just fine, even with an unresolved BSOD condition. Since the Intel drivers are nonnegotiable, and Windows Update will only go so far as to install the Microsoft Basic Display Adapter, there was no choice but to admin things up a little. I found that the official Intel drivers refused to install until I tweaked local Group Policy not to “prevent installation of devices using drivers that match these device setup classes.” After that, everything was all good, well, except for the pesky non-stop crashing.
Battling BSODs
Unfortunately, with the Intel driver installed the system immediately became crash-prone. The screen would flicker sporadically and then everything would lock up. Repeated testing taught me that the speed at which the crash occurred was directly influenced by how much interaction I had with the desktop. If I let the machine sit idle or started the screensaver as soon as it booted up and walked away, it ran without issue. However, if I moved the mouse around a bit and opened some menus on the desktop the screen would start to flicker and the system would freeze within seconds.
I covered all the basics, and then some, when troubleshooting this behavior. I played with driver versions, cooling, and hardware combinations to name a few. I specifically confirmed that the screen was happy when connected to other PCs and the Rock Pi X was happy when connected to other screens. I eventually decided that for the purpose of this project I didn’t actually need to resolve the issue, but it still bugged me.
It’s possible that the crashes I’m experiencing are specific to the hardware I have and not to all would-be systems built with the same components. I don’t plan on experimenting with that due to timing and expense, though. Besides, it turned out there was a convoluted workaround.
The “Fix”
I installed Xubuntu to dual-boot on the system as a Hail Mary to see if it was up to running Serene Screen via Wine (it wasn’t). I did learn that Linux was completely stable on the hardware, though. Strangely, when I rebooted into Windows 10, I was surprised to find that it too was suddenly stable. Up until that point, my best explanation for the crashes had been some esoteric combination of the IGP’s boost clock, a power-delivery hiccup, and the unique screen resolution causing the Intel driver to go mad. Now, I found myself wondering what kind of firmware, microcontroller tweak, or other magic Linux had done to the system that somehow fixed Windows.Further experimentation revealed that rebooting Windows without going back to Linux first left the “fix” in place. Curiously, removing power from the system and then booting back into Windows directly brought back the original crashing behavior. Amazingly, starting Linux again and then returning to Windows consistently made for a stable experience. I have no idea why it’s working that way, but I’ll take it. If any of you reading this have any insight into this behavior, we'd love to hear from you in the comments.
Wrapping Up And Impressions
So, what exactly did all this fish fanaticism net me? Well, I’m pleased to say that I’m absolutely thrilled with the outcome of this project. Serene Screen looks stunning on the small vivid display and it runs at a smooth 75-80fps. I use the screensaver’s built-in frame rate limiter to keep it at 60fps, though. That reduces the temperature of the Atom chip a bit, which does run a quite warm under the small passive heatsink. I did consider adding a 40mm 5V Noctua fan to reduce the 83ºC peak I’ve seen reached under full load. However, I decided against it when the significant temperature decrease afforded by additional airflow failed to improve stability. It was tempting to add the fan just to have a Noctua product actually match the color of a build for once, though.
Something to note about performance, Serene Screen runs silky smooth in windowed mode on this setup, but mysteriously it only runs at about 25fps in full screen mode. Fortunately, it’s easy to make windowed mode look like full screen mode by enabling the setting to hide the screensaver’s title bar and setting title bars to black in Windows. Full screen mode runs at full speed when the system is connected to a standard monitor, which furthers my theory that there’s just something fishy going on with the Intel drivers and this particular resolution.
There you have it, my circuitous tale of a mildly eccentric build that makes for a sweet desktop toy, instant conversation starter, potential educational experience, and a homage to one of the greats. Jim Sachs’ Serene Screen Marine Aquarium looked remarkable for its time and, perhaps even more remarkably, still totally holds up two decades later. I think the three-piece combination of retro screensaver, pint-sized PC, and lilliputian mega-widescreen are just about the perfect match. At any rate, it makes me smile and that’s something I don’t take for granted.