Sound Blaster AE-9 Review: Pristine High Def PC Gaming Audio
On the rear bracket, we find the ports we'd expect from a high-end sound card. The red and white RCA connectors handle main stereo output duties while the pair of 1/8" jacks handle center, sub, and left/right surround for an analog 5.1 setup. Two optical S/PDIF connectors allow for both input and output of digital signals. The port on the far left of the photo looks like a mini HDMI connection, but it's for the Sound Blaster AE-9's Audio Control Module breakout box. Creative warns in the AE-9's manual not to connect any other mini HDMI connection to this port.
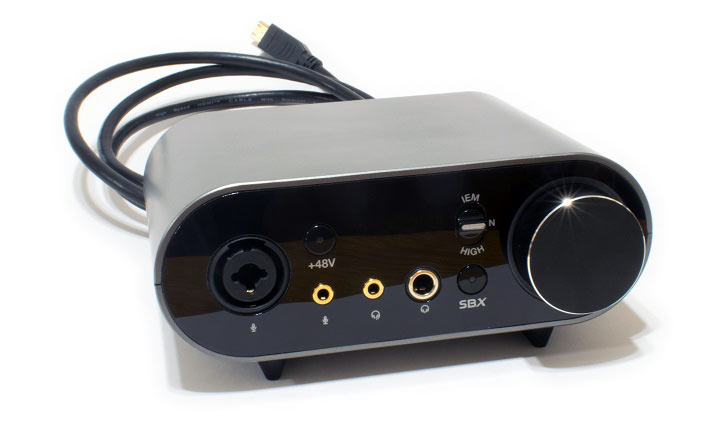
The ACM has plenty of connectivity of its own. On the rear of the box is another pair of RCA connectors that can be used for stereo auxiliary input. Around the front we find the aforementioned XLR/TRS combo jack, a 1/8" microphone input, two differently-sized headphone jacks, and a volume knob. The AE-9 can only record audio from one input at a time. Changing sources in the Sound Blaster Command application is easy, though: press the Make Default button for any input to start capturing from it. However, this does impose limits on audio production because you can't, for example, plug a keyboard or synth module into the aux inputs and a microphone into the XLR jack and capture audio from both simultaneously like you can on most USB-powered audio interfaces.
The volume knob doubles as a quick way to toggle between headphones and speakers by pressing and holding for at least two seconds (but less than four). That's every bit as clunky as it sounds; why this couldn't be a quick tap is anybody's guess. Press and hold the volume button for four seconds to turn the LED ring around it on and off. Speaking of LEDs, a small display on the front of the unit shows the current volume for your headphones. This value is expressed as decibels below unity. The closer to zero you get, the louder music and other sounds will be in your headphones. Unlike many other audio-output devices (like a smartphone, for example), Creative doesn't limit the loudness by default, so be careful that you don't hurt your ears after you strap on your headphones.
The 1/8" headphone jack accepts four-pole headphones with a built-in microphone, which allows the AE-9 to handle both ends of your typical wired phone headset. The 1/4" jack is meant for headphones with that larger connector, but both jacks can't be used at the same time. If anything is plugged into the 1/8" jack, the 1/4" output gets shut off automatically. Both jacks rely on the same three-way impedence toggle, too. These two facts combined make it a little more difficult than it should be to switch between a pair of high-impedance cans and a pair of in-ear monitors or an analog gaming headset. Not only do you have to flip the switch to change impedence, you also have to unplug the IEMs. The ACM also has a pair of buttons, one to toggle +48 volt phantom power on the microphone input, and another to quickly enable or disable the SBX effects without having to open Sound Blaster Command.
The Sound Blaster Command Center
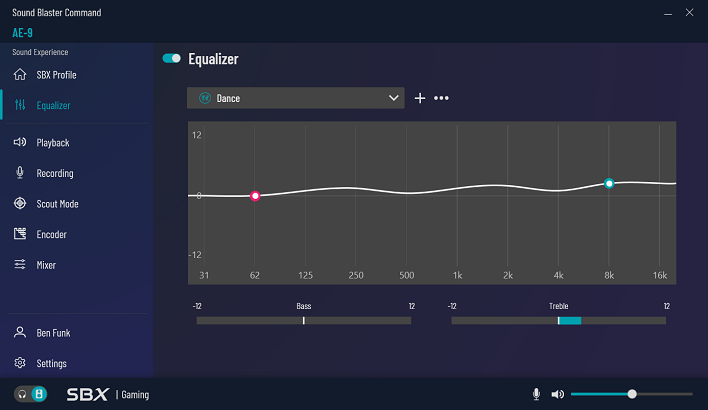
Speaking of Sound Blaster Command, this application hosts all of the AE-9's software effects and controls active inputs and outputs. While the most commonly-used features like volume adjustment, switching between speakers and headphones, and toggling effects can be controlled on the ACM breakout box, each effect's knobs and buttons can only be tweaked within the application. At no point did the app feel sluggish or bloated. The only control that seems to be missing is a way turn off the LEDs lighting the Sound Blaster and AE-9 logos on the side and top (or is it bottom?) of the card. The dual S/PDIF ports have interesting HTPC uses, but if the light from the LEDs comes through your HTPC's case they could be a distraction.There are several tabs on this interface, which is friendly and easy to get around. The SBX Profile tab lets you turn on gaming-focused effects like Virtual Surround, Crystalizer, Bass Boost, and so on. The Equalizer tab lets you quickly switch between pre-baked profiles or set up your own EQ curve. Playback and Recording let you tell Sound Blaster Command what other devices are connected to your sound card.
Scout Mode, which emphasizes quiet parts of game audio, gets its own tab outside of the other gaming features. Dolby and DTS Connect encoding lives on the Encoder tab. Mixer adjusts the volumes for speakers, the S/PDIF optical output, and input devices. Below that is a tab for your optional Creative account and the app settings, which includes auto-update settings.


