How To Build A Commodore 64 With Raspberry Pi Zero For Under $50
It is with that in mind, along with knowing how popular our Building An Amiga Emulator article was, that we decided to show you how to build your own ultra small form factor Commodore 64 emulator, for just a few dollars, using the teeny-tiny Raspberry Pi Zero.
The Commodore 64, like virtually all competing 8-bit machines at the time, was built around a modified version of the MOS 6502, dubbed the MOS 6510. Accompanying the CPU was a graphics chip (the VIC-II), a sound chip (the venerable SID), a whopping 64K of RAM and 20K of ROM. Although the Commodore 64 was relatively powerful and more capable than most of the other personal computers of its time, even the ultra-low-power Raspberry Pi Zero has significantly more horsepower than is necessary to emulate the machine.
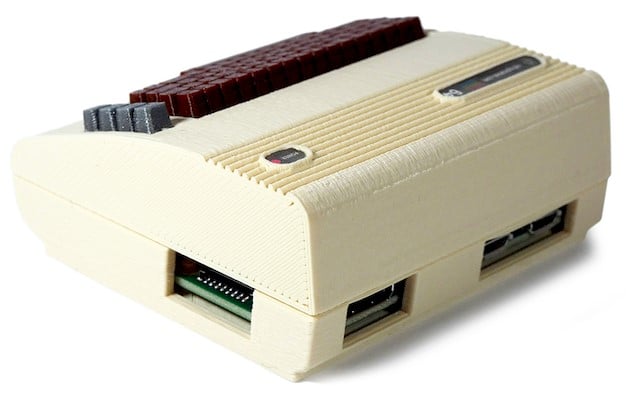
A standard issue Raspberry Pi would work fine for this project. In fact, the additional USB ports and wired Ethernet make the standard Pi a little easier to work with and add some flexibility (like being able to transfer ROMs via an FTP client like FileZilla). But we chose the Pi Zero to mix things up a bit and because of these awesome cases available from RetroPiCases.Com.
Technically, all you need for this build is a Raspberry Pi Zero, some MicroSD storage, a USB keyboard, and a slick, customized OS for the Pi that leverages the “Versatile Commodore Emulator”, or VICE, called Combian 64. You also need some simple, free apps to prepare the MicroSD card and write the Combian 64 image, like the SD Card Formatter and Win32Disk Imager, as well as a USB stick to transfer ROMs / disk images over. But don’t worry, the USB stick can be tiny – C64 floppy disks held only about 170K of data.
Here’s a link to the hardware we used…
That kit includes everything you’ll need to get going, including a MicroSD card, a basic case, a power supply, and some adapters to connect various cabling. A major drawback to using the Pi Zero is that it only has a single micro-USB port available. For the initial setup, you’ll need to connect a USB hub so that a keyboard and the USB stick can be connected simultaneously, but technically only a keyboard is necessary once the setup is complete. With that said, for the best gaming experience, a gamepad / joystick is a must as well, so a cheap hub like this one may be a worthwhile accessory. If you don’t have one kicking around, a USB gamepad known to work with the Pi is a good idea as well.
And here are some links to the software…
In addition to these items, you’ll also need a decompression program like WinRAR to extract any files and Commodore 64 disk images that you download. We should also note that the Combian website requires authorization to download, but requests are usually approved in a just a few minutes.
Perhaps the coolest accessory for your C64 emulator would be one of these cases available at retropicases.com.
RetroPiCases offers an array of cases for the standard Pi and one for the Pi Zero that replicate the look of popular machines like the C64, Amiga, Atari ST, and others. Of course, a custom case is optional and pushes the total price up over the $50 mark, but these 3D printed cases definitely add something special and would make even the most hardened geek feel a sense of nostalgia.
Let's get this thing set up...


