Microsoft Updates Windows 11 ISO Tool, How To Install It Without A Microsoft Account Or Internet Connection

To install Windows 11 on a PC, you have a few options. If you already have a Windows install on that system, you can do a Cloud Download reinstall from the Windows Recovery Environment (WinRE). If the machine's drives are blank, or you simply want to do it the old-fashioned way, the two options both require external storage: you can write the Windows install files to an external device using Microsoft's own Media Creation Tool, or you can download an ISO and use your own tool.
Don't worry; the ISOs aren't hopelessly behind like they might once be. Once upon a time Microsoft only used to publish installation ISOs with major feature updates, leaving you to download gigs of updates once you got running. Now, Microsoft updates the installation ISOs every month, so you likely will just have to install your drivers and download a few security updates. It really doesn't take long at all, especially if you use fast external storage (like a high-quality USB flash drive, SD card, or USB SSD.)
Before you get into this, I recommend downloading all of the drivers required for your system just in case. All you should really need to install manually are your graphics drivers and potentially your system chipset drivers, as most likely, Microsoft will have the drivers for your network adapter and it will download the drivers for everything else. I've installed a great many systems in the last ten years, and I've never really had an issue with this. Just make sure you get that big GPU driver package, because the ones distributed through Windows Update are not worth using.
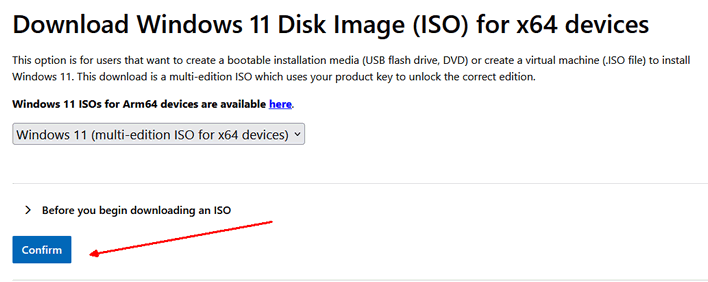
So here's the process: go to Microsoft's website and download the latest "Windows 11 Disk Image (ISO) for x64 devices." We're going to use Rufus to write this image to your external storage, so you can actually skip most of Microsoft's onerous requirements and install clean on anything from Intel Nehalem (first-gen Core) and AMD Barcelona (Phenom) or newer, although performance likely won't be great on chips that old.
Once you have the ISO downloaded, grab Rufus from its website; I recommend the "p" version, which is a portable release that will run from whatever directory it's in. Throw that anywhere (move it from your Downloads, as it will dump some files whereever it is) and run it. It'll detect external storage devices, so make sure you pick the right one in the top. Then, make sure "Boot selection" says "Disk or ISO Image" and click the big "SELECT" button; that'll open a file picker, so just pick the ISO you downloaded. After that, you can most likely just click "START" in the bottom and it'll pop up at least one dialog.
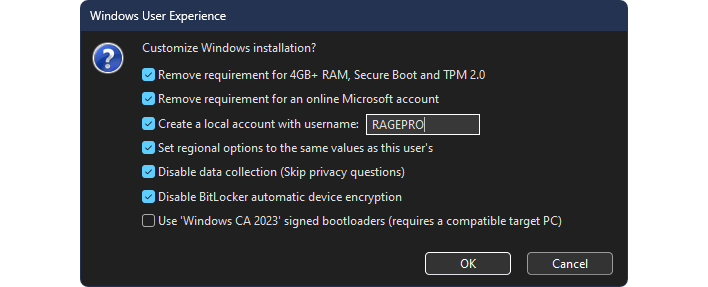
On this page, you can check boxes for all sorts of things:
- The top option will remove most of the security-oriented install requirements for Windows 11. Keep in mind that if you don't have 4GB of RAM, the machine will be very slow. Also, while you can install without Secure Boot and TPM 2.0 enabled, you may restricted from running certain applications (like Riot games) without them.
- You can remove the requirement for an online Microsoft account. This is the tweak that allows you to use the "start ms-cxh:localonly" bypass for the otherwise unskippable Microsoft account dialog.
- Creating a local account lets you bypass that step at setup. Keep in mind it will ask you to add a password to the account on your second boot; I recommend doing this because it will make file sharing work more easily.
- The other options are fairly straightforward: clone your current Windows install's region options, disable Microsoft's intrusive data collection, and disable the mandatory BitLocker encryption. These have no particular consequences, so feel free to tick them!
The last box, which is not ticked in our case, should be ticked if you're going to install this media on a device with an updated BIOS. Basically, the old secure boot certificates were invalidated and new certificates were issued; an updated system will puke on the old certificates, but using the new certificates requires to allow Rufus to do a small additional download, so do keep that in mind if you're doing this offline. If you're not using Secure Boot, though, it doesn't matter either way.
Rufus will then write the media to the external drive, and then you simply have to boot to it. Most systems now have a boot menu where you can select what media to use; to open this, hit F12 or ESC (usually; some systems have F11 or other keys) as the machine is completing POST. Alternatively, you can usually use DEL to enter the UEFI setup and change the boot order such that your external device is the first boot device. Once you're in Windows setup, it should be smooth sailing; simply delete the partitions on your drive, select the empty space, and hit "Next"; you don't have to manually create any partitions.
Finally, install your drivers, and you're ready to go, as long as your system came with a Windows license. I won't advise you on your favorite tweaking tools, but if you need a Windows license, you can purchase one from the Windows store on your live system. Happy tweaking on your new Windows install!
