Zalman Z-Machine GT1000 High End Gaming Case
|
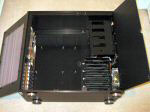
One of the most surprising and unique design features of this case is the way the side panels function. As we mentioned above, the panel consists of two doors that open after removing two screws for each side of the panel. The left side opens far enough to reach the surface that you are working on, which means it shouldn't get in your way when you are working inside the case. The right side doesn't open nearly as far, but we don't think it will get in the way during installation either. With the case's internals exposed, you can see that the entire inside of the case is black, which we think looks great and further shows that this case has a quality that is head and shoulders above the average ATX enclosure.
When you take a closer look inside, you can see that the PCI slot covers are secured by thumbscrews, another tool-less feature that is easy to appreciate. Opposite the PCI slot covers and 120mm fan, you can see the drive bays and 92mm fans, which are in front of the hard drive bays. The top two 5.25" drive bays already have thumbscrews installed (and fixed) in them. This is a slightly different way to create tool-free optical drive installation, but it works just fine. Below the 5.25" bays, you will notice the hard drive cage. Hard drives slide in and are guided by rollers for another nice tool-less feature. The only thing that concerns us about the hard drive cage is that it doesn't look like it will allow for optimal airflow from those two 92mm fans in front of the cage.
The left panel window is secured on the inside by screws. The window is made of a relatively thick acrylic. If you looked at the specs of this case and saw the 4-drive hard drive cage above, you may be wondering how six hard drives can fit in the GT1000. Well, check out the second picture below, and you'll see the unique approach Zalman took to allow two more hard drives to be installed. On the bottom of the case, there are eight rubber-covered screws and a couple sets of securing mechanisms. It is a clever design; we'll show you how it works on the next page.
To open up the other side of the case, you have to use the included Allen wrench. The smaller part that covers the drive bays is secured by two hex bolts and is hinged like the other side of the case. The larger part, on the other hand, is secured by four hex bolts and can be removed. When removed, it can act like a motherboard tray, which as you can see already has the motherboard stand-offs installed.
We already knew the GT1000 was made of impressive 4-5mm thick aluminum before we even touched this case, but the thickness of the case became really apparent when we removed the motherboard tray. In the first picture below, you can see how thick the panel is compared to a U.S. dime. In order to truly appreciate this, you probably have to have at least a little experience with other aluminum cases, but if you haven't ever used an aluminum case, trust us when we say that the build quality of this one is top notch, due in large part to its thickness.
The final aspect of the GT1000's internals that we want to show you is all the cables that are connected to the front for the front-mounted I/O ports. These cables include connectors for USB, FireWire, and audio. In addition to these I/O connectors, you can see the motherboard connectors and the two 92mm fan power connectors. We wish Zalman would have made those fan power cables a bit longer to increase the chance that we wouldn't have to use an extension or adapter cable of some sort.


