Antec Nine Hundred Advanced Gaming Case

|
|
|
; "PSU Mount")
; "Lower Corner")
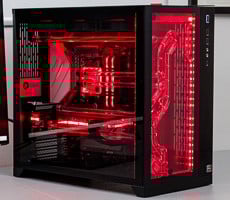
Opening up the Nine Hundred, the first thing that one notices is that the Power Supply Unit gets installed on the bottom of the case instead of the top, due to the placement of the 200mm fan. It makes a fully installed PC more bottom-heavy and thus more stable than a typically top-placed PSU, and also frees up the area around the CPU. The Nine Hundred will allow PSU's to be installed traditionally, but also supports an upside-down installation for units with a lower-mounted fan, such as our Antec Trio650. Mounted in this orientation, the PSU fan assists in pulling heated air away from the now closer placed video cards and exhausts it out of the system.
; "Upper Fans")
; "Middle Fan Mount")
Assisting the upper mounted 200mm "Big Boy" is an additional 120mm TriCool fan similar to the ones mounted on the hard drive cages but without the LED, and it too comes with a 3-speed switch control. Finally, attached to the back of the middle drive cage was another mount for an additional 120mm fan, which we didn't put into action. For ease of installation and reducing cable clutter, we removed the mount completely.
; "Drive Fans")
; "Cages")
; "Cage Removal")
On the other side of the chassis, we could now view the drive cages. Each cage can house up to three hard drives, all of which receive the benefit of the built-in 120mm fan. The cages are attached to the chassis by eight large thumb-screws - larger than the ones used to keep the doors on the chassis. At first, this appears to be a good thing, as it means that the cages can be easily removed. On second thought, thumbscrews are used for frequently accessed items, and just how often would one need to remove a hard drive? The process of removing both side panels, then removing all eight thumbscrews, pulling out the tray and installing or uninstalling a drive becomes quite tedious. It also requires either nerves of steel or at least a magnetic screwdriver to place the screws within the holes in the cage. Installation via rails would have much more preferred here, not to mention the lack of any kind of sound or vibration dampening materials created another sour note.
; "Cabling")
; "Open Slots")
The cables hanging down from the front panel as well as a power cable for one of the fans and the speed control switch are tied down to points on the backplane with zip ties, helping keep cable clutter down. However, they are rather flimsy and will probably need to be replaced with your own when more cables have been added. The two tie-down points, one at the top and the other at the bottom, are punched out of the steel backplane, making them a permanent and sturdy way to guide cables around the chassis. Without a way to remove the motherboard tray and guide cables behind it, the tie-down points become essential.