Now that
Windows 11 is out, you might be internally debating whether to make the leap now, wait a bit for it to mature, or stick with Windows 10 (or whatever OS you are currently using) for the long haul. The decision is up to you, of course, but if you need help deciding, you can test drive Windows 11 without committing to it on your main system. One of the best ways to do that is to create a 'Windows To Go' USB flash drive.
This made easy with Rufus, a handy image burning utility that streamlines the process of creating a bootable USB drive. And this doesn't have to be just for Windows 11, either—you could make a bootable USB flash drive based on any version of Windows. This guide is focused on Windows 11 specifically for the simple fact that it is Microsoft's shiny new OS, and there is understandably a lot of interest (and some
confusion over unsupported PCs).
Windows 11 To Go - Start With a 64GB Or Larger USB Flash Drive
To get started, you'll need a USB drive. The one we used is a
128GB Samsung Fit Plus USB 3.1 drive, which at the time of this writing is
$20.99 on Amazon (on sale from $44.99). Another interesting option is the
128GB Lexar USB 3.2 Gen 1 flash drive with both USB Type-C and Type-A connectors (the connecting arm swivels!), priced at
$19.28 on Amazon (down from $26.99).
We installed Windows 11 To Go on a 128GB USB flash drive, leaving us with 86.9GB of free space
Those are just two options. We recommend going with a 64GB or larger USB drive, and the faster it is, the better. After following this process on our 128GB Samsung Fit Plus drive, a 260MB recovery partition was created and 32.1GB was used on the main partition (for Windows 11), leaving 86.9GB of free, usable storage space.
Installing Windows 11 To Go On Your USB Flash Drive
Click to Enlarge
Once you have chosen and procured a USB flash drive, you are ready to begin. It's a quick and easy process, though the overall time it takes will depend on the speed of your internet connection, because you have to download the Windows 11 ISO.
Anyway, here are the steps...
- Download the Windows 11 ISO from Microsoft.
- Download the Rufus bootable USB creation tool (latest version at the time of this writing is 3.16).
- Plug your USB flash drive into your PC (note that all data on it will be destroyed).
- Run the Rufus utility
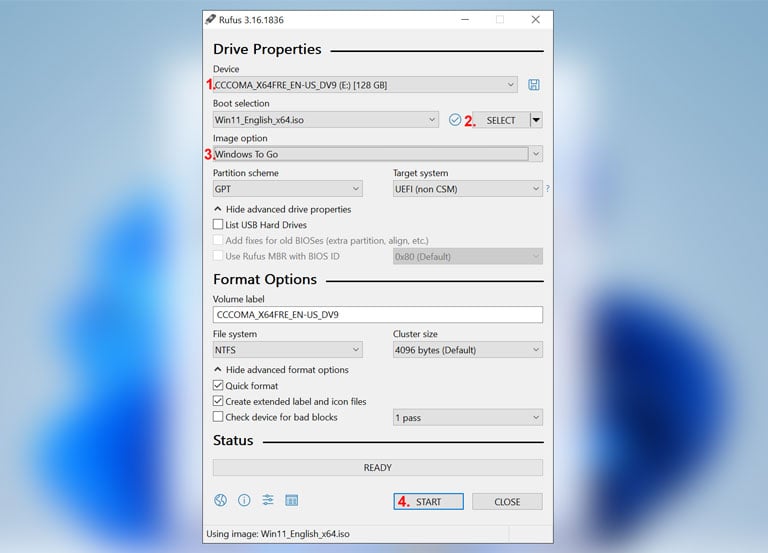
- Select your USB flash drive from the Device drop-down menu at the top.
- Hit the Select button at the upper-right and navigate and and select the Windows 11 ISO.
- From the Image Option drop down menu, select Windows To Go (this could also be used to create a standard Windows 11 installation media or automatically create installation media with the TPM, Secure Boot, and minimum memory requirements removed, as we outlined in a separate Windows 11 guide).
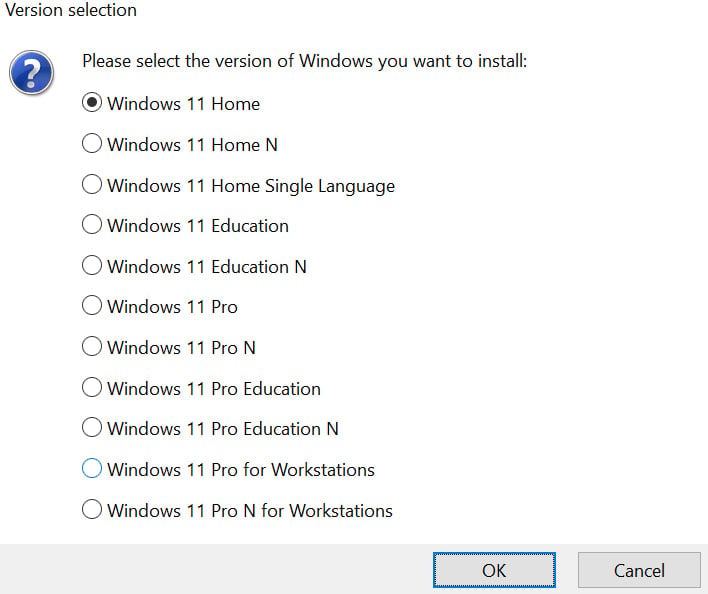
- Click Start, and a windows will pop up prompting you to select your desired Windows version. Choose whichever edition you prefer.
- Click OK and Rufus will get to work setting up the flash drive for use as a Windows 11 To Go drive.
Once Rufus finishes doing its thing, you will be able to boot to your newly created Windows To Go USB flash drive on a compatible machine and it will behave almost like an native, local Windows 11 installation. On first boot, it will ask you to accept the terms of service, connect to a network, create an account, and so forth. Just like a clean Windows 11 install. It will even run Windows Update to grab drivers and patches.
This is a no-fuss way of taking Windows 11 for a spin, without committing to it outright. The same can be said about using a virtual machine, though the added benefit here is that this is essentially a portable version of Windows 11 that can be booted on multiple PCs.
Microsoft actually removed its Windows To Go feature starting with Windows 10 version 2004, but Rufus thumbs its nose at the move. Your mileage may vary, of course, but for us the above steps worked like a charm.


