|
|
| Specifications and Features | ||||||
|
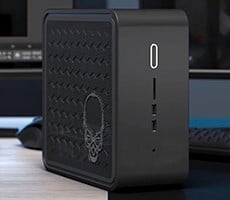
When it comes time for a new rig, there are those who want the power of a full-sized system but without the footprint of a mid or full sized case. Today, we're going to take a look at a barebones kit that promises full-sized performance in a footprint no bigger than a shoebox. Enter the Shuttle SDXi Barebones Kit. 
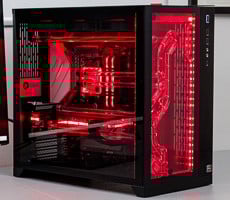
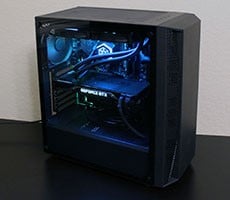
The SDXi Barebone kit comes with support for the latest Intel CPUs, up to 8GB of DDR2 RAM, RAID and it is backed by some seriously good looks. On the outside is a custom flamed-out paint job akin to a custom car, while the inside provides the muscle to rival that of a full-sized equivalent. With the SDXI Barebones kit, Shuttle aims to deliver performance, good looks and a compact design without sacrificing features and performance. The goodness doesn't stop there though. Shuttle also works in liquid VGA cooling to help support CrossFire and few other surprises that make the Shuttle SDXi Barebones Kit stand-out from other SFF systems. Read on to see if all of the features, performance and looks make Shuttle's latest barebones kit standout for all the right reasons.
The unit we received for evaluation had been around the block a view times, so we didn't receive all of the hardware and accessories that would normally accompany the product. We do have a good idea of what you can expect, however. Naturally, the package comes with the necessary drivers CDs and floppies to ensure all of the hardware is setup properly during installation. Shuttle also included a SATA cable, Floppy cable and power cord along with Molex to floppy power adapter and mounting screws. What's not pictured, and was missing from our sample, is an installation guide which would cover the complete break down and reassembly of the unit. |
| Shuttle XPC SDXi: Up Close - Outside | ||||
When it comes to appearances, the SDXi Barebones kit doesn't disappoint. With a high-gloss flame finish, the unit is reminiscent of the paint jobs found on a classic muscle car. The flames are most intense on the front of the unit and blend nicely as it flows to the rear, fading to a solid black. Note that both sides of the unit sport matching perforations for ample airflow within the tight confines of the case, while the top of the unit also offers a mesh area which helps ventilate the VGA water cooling kit. On the inside, Shuttle outfits the SDXi with a motherboard based on Intel's 975X Chipset, offering support for all Intel Core 2 processors from economy processors up through the Extreme series. The mainboard offers a surprising four DIMM slots that support up to 2GB of DDR2 memory per slot, clocked as high as DDR2-667. The board offers plenty of storage options, including 3 SATA 3.0GB/s ports and an External eSATA port off the rear of the unit. Masked by a pressure sensitive door, the front of the case offers front mounted Mic and Headphone ports as well as two USB 2.0 ports and a mini IEEE 1394 port. Along the right side is a vertical chrome strip that has Power and Reset buttons as well as Power and Hard Drive LEDs. The upper half of the case is comprised of two drive bays that support both optical and hard drives with the overall unit capacity maxing out at three hard drives. When shifting the focus to the rear of the unit, we find two slot loactions that complement the CrossFire ready motherboard's dual PCI Express x16 slots. The rear console also delivers a broad selection of inputs and outputs including a standard IEEE 1394 port, one External SATA port, one RJ-45 Gigabit Ethernet port and six USB ports. Most unique is external access at the upper left corner for clearing the BIOS, which is a handy option for overclockers. For audio, the options are plentiful, with a Coaxial S/PDIF output, S/PDIF input/output, Line-In, Side, Rear Surround and Center/Base ports. |
| Shuttle XPC SDXi: Breaking it Down | ||||
Breaking down the case is pretty straight forward. First, four screws are removed from the rear of the XPC and the flame adorned cover slides back and off quite easily. Next, a support bracket straddling the drive cage is lifted out after removing four more screws. The drive cage itself also comes out relatively easily by sliding it back and then lifting it out, exposing the mainboard. Once removed, the hard drives can be mounted outside of the case and then slipped into position. The processor can be put into position and then the custom Shuttle ICE Heat Pipe cooler gets secured with four spring loaded screws at the base of the sink. The memory can be installed at any time as side access makes for easy installation. Up to two PCI Express graphics cards can be installed; in a dual card configuration 8 PCI Express lanes are routed to each card, when a single card is used it gets full or PCI Express x16 connectivity. Most likely, Radeon based card(s) will be installed since this unit comes with a custom VGA waterblock designed for the Radeon X1950 Pro. Once the hardware is in position, the hard drive(s) and optical drive can be connected to the mainboard's SATA and IDE ports and then connected to the unit's 400w power supply unit. For improved airflow, there is a side mounted fan that works in concert with the CPU fan and PSU rear exhaust to maintain a steady flow of air from the front to the rear, dumping warmed air out the rear of the case. |
| Shuttle XPC SDXi: VGA Water Cooling | ||||
|
As we alluded to earlier, the SDXi Barebones kit is also equipped with a custom VGA watercooling setup. This particular unit is a MTEC System by CoolIT and is designed for use with Radeon based products. The formal specifications on the MTEC unit is unclear, however, the full SDXi System comes with dual Radeon X1950 Pros, so we opted to see how the water cooling unit matched up to our ASUS X1950 Pro. Before doing so, however, let's review the basics of the unit. The block assembly is mounted up high, at the rear of the drive cage and ventilates out of the top of the case. The unit is equipped with two fans that draw air across the finned block, exhausting the warm air out of the top of the case. The two VGA waterblocks are connected in series with each other and we should also note that the water cooling is not very quiet. The MTEC allows two cards to be installed together in a very tight space where the card's stock air coolers would make this impossible. Once we removed the heat sink from our ASUS Radeon X1950 Pro, it became immediately evident that the VGA cooler would not work with our card. The way our card was designed, the rear X shaped backplate is thinner, to prevent contact with components on the rear of the PCB. With the backplate of the CoolIT MTEC system, the wider design hits several small components on the upper left, making it impossible to use. We thought it might be possible to utilize the stock backplate that came with this particular card, but the threaded stand-offs are a part of the main heat sink body, meaning the screws are threaded into the sink from the rear of the PCB. With the CoolIt MTEC system, the screws tie into the backplate, which is completely opposite. So, those looking to consider this barebones kit will need to make sure it will work with their make and model graphics card. Their is a hardware compatability list available online, however, it appears to be official support for hardware to work with the motherboard, not specifically the MTEC water cooling kit. So, a fair amount of homework will need to be done to ensure there will be no issues with your particular hardware. After testing this out, it's clear that choices may be limited with the MTEC's current design. A seemingly simple solution to added compatibility would be to create a thinner back plate as seen with the ASUS air cooled design. By thinning the frame, we think the MTEC kit might be able to support a few more models and avoid the issues we encountered with our X1950 Pro. |
| BIOS and Overclocking Performance | ||||
Much of the BIOS that drives the SDXi Barebones kit is standard fair. The Advanced BIOS Features section covers much of the basics such as device boot order, security options and hard disk priority. The OnChip IDE Device page focuses on drive settings including Block Mode options and On-Chip SATA settings that cater to the types of devices connected. Power Management Setup contained common power control options and PnP/PCI Configurations offered finer control over IRQ settings if the need arises. The PC Health Status window provides controls over CPU fan behavior while giving a one-stop status of key system voltages, temperatures and fan speeds. The Frequency/Voltage Control screen was a bit spartan in our opinion, but it did offer what was needed to tweak and enhance system performance over and above stock settings. The CPU Clock ranged from a minimum of 133 to a peak of 355MHz. CPU Voltage setting offered finite control, moving in increments of +25mV up to +800mV. DDR2 voltage was lacking, with options of 1.9, 2.0 and 2.1v. There were also options to adjust the memory CAS Latency, RAS to CAS Delay, RAS Precharge and Memory Frequency. With basic overclocking options and minimal DDR2 voltage control, we stepped into the overclocking segment with relatively low expectations. When it came to squeezing out any extra horsepower, our methods with this system were straight forward, raising the memory voltage to 2.1v, adding +100mv to the CPU voltage and raising the FSB until the system stalled. In the end, we managed to peak the FSB as high as it would go, topping out at 355MHz. This was a solid gain that pushed an E6400 CPU from 2.13GHz up to a stable 2.84GHz, resulting in an increase of 33%. |
| Our Test Systems and FutureMark's PCMark05 | ||||||||||||
|
How we configured our test systems: When configuring our test systems for this article, we first entered their respective system BIOSes and set each board to its "Optimized" or "High performance Defaults". The hard drives were then formatted, and Windows XP Professional (SP2) was installed. When the Windows installation was complete, we installed the drivers necessary for our components, and removed Windows Messenger from the system. Auto-Updating and System Restore were then disabled and we set up a 1024MB permanent page file on the same partition as the Windows installation. Lastly, we set Windows XP's Visual Effects to "best performance," installed all of our benchmarking software, defragged the hard drives, and ran all of the tests.
"The CPU test suite is a collection of tests that are run to isolate the performance of the CPU. The CPU Test Suite also includes multithreading: two of the test scenarios are run multithreaded; the other including two simultaneous tests and the other running four tests simultaneously. The remaining six tests are run single threaded. Operations include, File Compression/Decompression, Encryption/Decryption, Image Decompression, and Audio Compression" - Courtesy FutureMark Corp.
Comparing the synthetic CPU performance to the full size ASUS P5W DH Deluxe system shows the Shuttle SDXi offers the same potential as its full-sized counterpart.
"The Memory test suite is a collection of tests that isolate the performance of the memory subsystem. The memory subsystem consists of various devices on the PC. This includes the main memory, the CPU internal cache (known as the L1 cache) and the external cache (known as the L2 cache). As it is difficult to find applications that only stress the memory, we explicitly developed a set of tests geared for this purpose. The tests are written in C++ and assembly. They include: Reading data blocks from memory, Writing data blocks to memory performing copy operations on data blocks, random access to data items and latency testing." - Courtesy FutureMark Corp. FutureMark's PCMark05 Memory Performance test also showed the Shuttle SDXi to be on par with similarly equipped systems. |
| Worldbench 5.0: Office XP SP2 and Photoshop 7 | ||||
|
PC World Magazine's Worldbench 5.0 is a Business and Professional application benchmark. The tests consist of a number of performance modules that each utilize one, or a group of popular applications to gauge performance.
Below we have the results from WB 5.0's Office XP SP2 and Photoshop 7 performance modules, recorded in seconds. Lower times indicate better performance.
In both tests, the SDXi trailed the ASUS P5W DH Deluxe; by a mere four seconds with the Office XP SP-2 test and one second with the Photoshop 7 component. As expected, the Intel based systems held a major lead over the Athlon X2 6000+ test bed. |
| LAME MT MP3 Encoding | ||||
|
In our custom LAME MT MP3 encoding test, we convert a large WAV file to the MP3 format, which is a very popular scenario that many end users work with on a day-to-day basis to provide portability and storage of their digital audio content.
With the LAME MT test being CPU intensive, we rarely see variations between multiple test systems equipped with the same CPU. In this case it was no different, with the Shuttle SDXi and the ASUS P5W DH Deluxe delivering the same level of efficiency in CPU performance.
|
| Cinebench R9.5 and Futuremark 3DMark06 | ||||||||
|
The Cinebench 9.5 benchmark is an OpenGL 3D rendering performance test based on the commercially available Cinema 4D application. Cinema 4D from Maxon is a 3D rendering and animation suite used by 3D animation houses and producers like Sony Animation and many others. And of course it's very demanding of system processor resources.
This is a multi-threaded, multi-processor aware benchmark that renders a single 3D scene and tracks the length of the entire process. The time it took each test system to render the entire scene is represented in the graph below (listed in seconds). With Cinebench R9.5 testing, we saw a slight increase in the time it took to complete each test with the SDXi, adding 1 second to each test vs the ASUS P5W DH Deluxe. In the end, this difference is negligable.
3DMark06's built-in CPU test is a multi-threaded "gaming related" DirectX metric that's useful for comparing relative performance between similarly equipped systems. This test consists of two different 3D scenes that are generated with a software renderer that is dependent on the host CPU's performance. This means that the calculations normally reserved for your 3D accelerator are instead sent to the central processor. The number of frames generated per second in each test are used to determine the final score. With this test component, the Shuttle SDXi system managed a small lead over the full-sized ASUS P5W DH Deluxe, pulling 10 points ahead. This isn't anything tremendous, resulting in a .3% lead. |
| Benchmarks with Quake 4 and F.E.A.R. | ||||||||
|
For our next set of tests, we benchmarked all of the test systems using a custom single-player Quake 4 timedemo. Here, we installed the game's official v1.3 point release which is SMP capable and ran the benchmark with the resolution set at 640x480, and configured the game to run at its "Low-Quality" graphics setting. Although Quake 4 typically taxes today's high-end GPUs, when it's configured at these minimal settings, it is much more CPU and memory bandwidth-bound than anything else. In this test, the ASUS P5W DH Deluxe posted a nominal lead of roughly 5 FPS while the Athlon X2 6000+ test machine trailed no less than 11 FPS.
For our last set of game tests, we moved on to more in-game benchmarking with F.E.A.R. When testing processors with F.E.A.R., we drop the resolution to 640x480 and reduce all of the in-game graphical options to their minimum values to isolate CPU and memory performance as much as possible. However, the in-game "effects" and "advanced computer options" settings, which control the level of detail for F.E.A.R.'s physics engine and particle system, are left at their maximum values, since these actually do place some load on the CPU rather than GPU.
Once again, the ASUS P5W DH Deluxe posted a marginal lead over the Shuttle SDXi, with a 7FPS gain. Again, the Athlon X2 6000+ system trailed significantly, this time by 14 FPS at minimum. |
| Our Summary and Conclusion | ||||
|
Performance Summary: The Shuttle SDXi Barebones kit delivered roughly the same level of performance as a similarly equipped test bed with a full-sized ATX motherboard. In the synthetic, productivity, rendering, encoding and low resolution gaming tests, the Shuttle SDXi Barebones Kit virtually matched an Asus P5W DH Deluxe motherboard step for step; although overall the SDXi did technically trail the P5W in a majority of tests. Another area of performance we haven't touched on yet was the system's noise levels. During our testing we have to say, we found this system to be a bit loud for our tastes. While the MTEC water cooling setup allows for two PCI Express graphics cards to fit next to each other in a small space, it does not help this system run any quieter. In fact, it seems a bit louder than other units we’ve recently tested, which is not something we were expecting.
As we reflect on our experience with Shuttle's SDXi Barebones kit, there are a number of factors to consider. First, when it comes to features, appearance and performance, the SDXi Barebones Kit is undeniably impressive. This unit sports an ample array of features, delivers competitive performance and looks great doing it. We think using a liquid cooling kit to help accommodate two PCI Express graphics cards in a small form factor design is a great idea, but there are other factors that work against the SDXi Barebones kit. Two of the biggest issues we have at this time are the availability of information on this product as well as the availability of the product itself. We've had this unit in our labs for quite some time now. Still, with all the time that has passed, this exact item is not listed on the Shuttle website. And the 1337 series, which is a complete system based on this chassis, has been stuck in back-order for quite a while. The SDXi, with its custom paint-job and $999 price-tag (which includes painted case, liquid cooling system, and painted keyboard and mouse) is obviously a boutique-type product not meant for wide distribution. But seeing as how it is based on the recently discontinued SD37P2 V2 XPC and differs only by the custom paint job and water cooling kit, we assume availability will remain extremely limited until a newer model is eventually released that replaces it. Based on our hands on experience, we were generally impressed with the hardware at the heart of the Shuttle SDXi Barebones kit. But for potential consumers, getting your hands on one will likely be the biggest obstacle even if you can justify the exorbitant asking price.
|