Logo   Banner   TopRight
TopUnder
Transparent
Antec Nine Hundred Advanced Gaming Case
Transparent
Date: May 25, 2007
Section:Misc
Author: Robert Maloney
Transparent
Introduction

Heat as you all know is one of the main enemies of the PC and its many components.  Just visit any PC Hardware-related site out there today and you will find whole sections devoted to heatsinks, coolers, etc., the sole goal of which is to cool down the ever growing number of heat producing components in a typical PC.  Motherboard manufacturers have also jumped into the fray, providing their own customized cooling solutions, ranging from passive heatsinks linking the CPU, NorthBridge, and SouthBridge to the oversized Turbo coolers than we found on the Gigabyte G1-Turbo a few months back. 

However, all of these cooling tools are put to work within the chassis.  Airflow within the unit pretty much dictates how well the heat is dissipated; even the best heatsinks are rendered pretty much usless if there isn't adequate airflow within the system to cool them down.  And although modern cases typically have more options for installing fans and increasing ventilation, they are typically still steel and/or plastic contraptions of heat-trapping death.

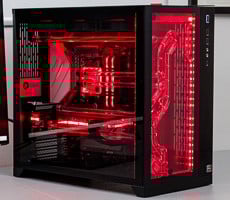
So, what's the alternative?  How about a case that's almost completely open, providing better cooling by allowing air to freely enter and leave the system.  How about fans placed seemingly everywhere - front, back, side, and even on top?  That's what Antec has introduced with the Antec Nine Hundred Gaming Chassis. Although the naming convention might initially turn away anybody not interested in gaming (all 5 of you), they would be missing out, as this case offers premium cooling and looks, without the hefty price tag that one might associate with a unit like this.


SPECIFICATIONS:

Model: Nine Hundred

Case Dimensions: 19.4"(H) x 18.4"(D) x 8.1"(W)

Drive Bays: 9 total
Front accessible: 3x 5.25"
Internal: 6x 3.5"/6x 5.25" or 3x 3.5"/9x 5.25"

Cooling System:
- 1 rear (standard) 120mm TriCool Fan with 3-speed switch control
- 1 top (standard) 200mm TriCool Fan
- 2 front (standard) 120mm Blue LED TriCool Fans
- 1 (optional) 120mm case fan on the side panel

Motherboard Class: Standard ATX

Main Board Size: 12"(W) x 9.6"(L)

Expansion slots: 7 slots

Weight (net/gross): 31/36 lbs

Top I/O: 2 USB 2.0 ports, FireWire, Mic-In & Headphone out jacks, Power and Reset buttons

Special Features: 200mm "Big Boy" Fan, windowed side panel, top USB/FireWire ports


small_bundle.jpg    small_ninehundred.jpg   

small_floppy.jpg    small_zones.jpg    small_converter.jpg

small_manuals.jpg    small_rubber.jpg

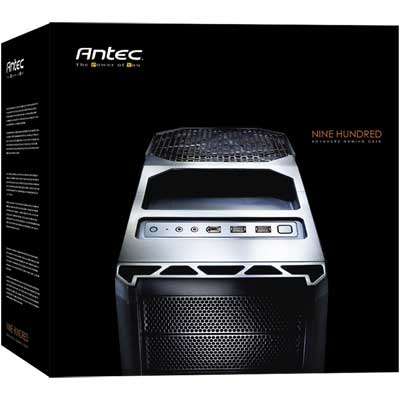
The Antec Nine Hundres's box is all black, just like the chassis itself, and yet it only gives the buyer a glimpse at the upper most corner with the words "NINE HUNDRED" written in orange.  The side and back offer much better views of the entire unit, glowing blue behind the black mesh from LEDs integrated into the fans.  Inside, there is the Antec 900 itself and a small group of items, some of which initially it might be hard to decipher.  The manual and screws are self-explanatory.  The mesh opening is used in conjunction with the tray to convert a 5 1/4" opening to fit a 3 1/2" drive, such as a floppy drive, if one desires.  The last piece, a rubber mat, fits into the same-shaped indentation on top of the Nine Hundred.  That's all there is at this point; all the fans and other cables come pre-installed, so we'll move on to looking at the chassis itself.

Transparent
Exterior Look

 test-s.gif
Exterior Look at the Antec Nine Hundred
Prepare to be blown away

small_frontfans.jpg    small_frontview.jpg    small_rearview.jpg

The Antec Nine Hundred is a steel case, painted with a matte black finish and its design is angular in a way reminiscint of a stealth fighter plane or the "tumbler" batmobile from Batman Begins.  Very militaristic looking. Although mostly made of steel - the front and top are molded plastic - the many preforations and openings created for the fans made the unit feel lightweight compared to its size, weighing in at just under 20 lbs.  The front of the Nine Hundred sports no less than nine 5 1/4" bays, all with perforated plates.  The lower six bays are divided into three bay cages, each cooled off by a 120mm Antec TriCool fan mounted directly behind the mesh and in front of the placement of the drives, with switches that control the speed. 

small_topdown.jpg    small_toppanel.jpg    small_topfan.jpg

Above the bays, the unit slopes upward featuring a "front" panel and what amounts to a recessed holder where the rubber mat gets placed.  The placement of the panel was necessitated by the mesh openings of the front bays, and may or may not take some getting used to.  When sitting above the Nine Hundred, the placement is perfect.  If its placed on a desktop, or other location above your sitting height, it requires looking up and over to find the buttons or ports.  Located in the panel are the power and reset buttons, as well as a blue activity LED.  The buttons are flush with the plastic, lessening the chance that they might get pushed by accident.  Two USB 2.0 ports, a FireWire port, and mic and speaker jacks complete the assortment.  Oft used items, such as a joystick or digital camera, can be placed in the tray behind the panel for easy access.  Behind the tray is a huge 200mm fan called the "Big Boy 200".  It also has a speed control for maximizing cooling or minimizing noise output, and allows heat to escape directly out of the top of the case.  The only detriment here is that the fan placement prevents putting anything else on top of the PC (which is perhaps why they put the tray where it is) and it also has large openings in the grating that could allow screws or other small pieces to fall through, landing on the CPU or video card below.

small_thumbscrew.jpg    small_rounded.jpg

The sides are held in place by two medium-size thumb screws, making it quick and easy to access the internals of the unit for installing or cleaning.  Each side door has something we very much appreciate, which is rounded off edges.  We were able to run our fingers all around the edges without cutting ourselves once, or even hitting a snag.  Gone are the days when simply opening a case could turn into a trip to the first-aid box.  The doors also slide on and off smoothly, making the seam tight and secure.  Very little effort is extended in the opening or closing of the case, which is more than I can say for some others we have tested, including the Asus Vento 3600.  To this day, I still cannot get the door on that chassis to sit correctly on its rails.

small_sideview.jpg    small_window.jpg

The left side panel is windowed, but in a way that only shows off the board and cards.  It is not a full window, as can be found in many other cases, but we prefer this since it does not show off the drives and allows us to hide the cabling somewhat.  An opening in the window allows for ventilation, but also has plastic clips on the inside for popping in an additional fan, not included in the package.  We opted to throw in another 120mm Antec fan to pull in air and blow directly onto the video card beneath.

Transparent
Interior Configuration

 test-s.gif
Taking a peek inside the Antec Nine Hundred
A Well-rounded Chassis 

small_emptypsu.jpg    small_innercorner.jpg

Opening up the Nine Hundred, the first thing that one notices is that the Power Supply Unit gets installed on the bottom of the case instead of the top, due to the placement of the 200mm fan.  It makes a fully installed PC more bottom-heavy and thus more stable than a typically top-placed PSU, and also frees up the area around the CPU.  The Nine Hundred will allow PSU's to be installed traditionally, but also supports an upside-down installation for units with a lower-mounted fan, such as our Antec Trio650.  Mounted in this orientation, the PSU fan assists in pulling heated air away from the now closer placed video cards and exhausts it out of the system.

small_upperfans.jpg    small_middlefan.jpg

Assisting the upper mounted 200mm "Big Boy" is an additional 120mm TriCool fan similar to the ones mounted on the hard drive cages but without the LED, and it too comes with a 3-speed switch control.  Finally, attached to the back of the middle drive cage was another mount for an additional 120mm fan, which we didn't put into action.  For ease of installation and reducing cable clutter, we removed the mount completely.

small_drivefans.jpg    small_cages.jpg   small_cageremoved.jpg

On the other side of the chassis, we could now view the drive cages.  Each cage can house up to three hard drives, all of which receive the benefit of the built-in 120mm fan.  The cages are attached to the chassis by eight large thumb-screws - larger than the ones used to keep the doors on the chassis.  At first, this appears to be a good thing, as it means that the cages can be easily removed.  On second thought, thumbscrews are used for frequently accessed items, and just how often would one need to remove a hard drive?  The process of removing both side panels, then removing all eight thumbscrews, pulling out the tray and installing or uninstalling a drive becomes quite tedious.  It also requires either nerves of steel or at least a magnetic screwdriver to place the screws within the holes in the cage.  Installation via rails would have much more preferred here, not to mention the lack of any kind of sound or vibration dampening materials created another sour note.

small_cables.jpg    small_slots.jpg

The cables hanging down from the front panel as well as a power cable for one of the fans and the speed control switch are tied down to points on the backplane with zip ties, helping keep cable clutter down. However, they are rather flimsy and will probably need to be replaced with your own when more cables have been added. The two tie-down points, one at the top and the other at the bottom, are punched out of the steel backplane, making them a permanent and sturdy way to guide cables around the chassis. Without a way to remove the motherboard tray and guide cables behind it, the tie-down points become essential.

Transparent
Motherboard Installation and Conclusion

System Installation Notes
Putting the pieces together

Installation started with flipping the Antec Tri650 upside down and tightening the screws to the backplate.  With the PSU installed in this manner, there's less concern with the cables flopping downward and getting in the way of heatsinks and other components, but we were a bit concerned whether or not the 12V Power cable would reach, as the connector was high up on the motherboards we installed.  The cable on the Trio650 was long enough, but others could have problems here. The only tricky part was running the 12V power cable back over the PSU, and then under the video card and up to the connector.  While we didn't spend a lot of time binding up the other cables, the end result of our installation was still quite neat in appearance, and the blue LEDs call more attention to the front of the case anyway.

The next order of business was to put in the I/O shield and motherboard, and quite frankly, there were no issues at all.  With the PSU at the bottom, we had plenty of room to match up the board to the mounts and attach the screws.  One thing to watch out for were the tied down cables and fan switches so that they don't wind up getting caught underneath.  After removing the drive cages, the hard drives slide easily enough inside, although not on rails as we might have preferred.  We had to manually line up the mounting holes on the drives with the holes in the cage, and then somehow get the screws in place.  This requires a good deal of patience and/or a magnetic screwdriver.

The hard drives were mounted in the lowest drive cage in order to free up room behind the video card, and it also placed the drives directly next to the SATA ports on the motherboard, further reducing the amount of distance their cables needed to travel.  Optical drives were much easier; simply slide them into place and attach the screws to the chassis.  Surprisingly, installing the floppy drive proved to be the most difficult part of all, as the drive needs to be held in the tray while aligned with the separate mesh coverplate, yet the two do not connect to each other.  The manual is also scant on both details and pictures here, showing little else than the drive sliding into place. It takes a while to get everything squared away properly, but once everything is installed correctly the front of the Nine Hundred really looks great, as you can see.

small_900_light.jpg    small_900_dark.jpg
THE FINAL PRODUCT

conclude.gif

We are big "fans" of the Antec Nine Hundred.  Even with four large fans, including the 200mm "Big Boy" at the top, the case's noise level is held in check by the included fan speed controlers.  Originally set to high, we were concerned with the noise output of the front fans, but after setting them to low we were very pleased with the results.  Each fan actually cools a specific zone, other than just offering the obvious benefit of increased airflow.  The two in the front, at least in our configuration, brought in cooler air with the middle fan directly blowing on the video card and the lower fan cooling the hard drives.  The uppermost fans are placed directly around the CPU.  Without the PSU blocking this area, there is nothing but open space here. Additional fans can also be mounted, as we did with another 120mm Antec TriCool on the side door,  As such, we were reaching internal temperatures of about 26°C and CPU temps around 37°C.

Numerous fans, along with the mostly open architecture of the Nine Hundred, create better cooling but they also have a undesirable side effect: accumulation of dust.  There's really no way around this fact other than to create filters for the fans, and to keep some canned-air handy.  We also had some concerns regarding the openings for the 200mm fan up top.  It seems too easy that a small object, even a screw, could find its way through the grating and land directly on the video card below.  Mounting the Power Supply Unit at the bottom of the case seems like a no-brainer, and Antec was a step ahead in allowing multiple orientation options, but only as long as the power cables actually reach their destinations.  We didn't encounter any problems using the Antec Trio650, but can't say for sure that others won't be left short.

  • Stylish design
  • Increased airflow
  • Lower PSU mount
  • Quiet Fans everywhere!
  • Dust collects at all of the openings
  • Grating for 200mm fan could allow objects through
  • Relatively Difficult drive installations

Discuss This Article And Share Your Comments!


Content Property of HotHardware.com