GTR Tech Corporation GT3-BH PC Chassis

It's probably safe to assert that, by and large, DIY Small Form Factor PCs are still niche products. Although they have been offered by the likes of Shuttle, AOpen, MSI and many others for nearly half a decade now, there's still an audible gasp that's heard from non PC-centric folks when then first encounter one. Questions range from, "What is it?" to "What does it do?" And even when it has been explained that the mini machine is simply a PC, albeit much smaller than usual, heads still shake, believing that a PC must be big and bulky in order to work properly. It's a common belief, if only because whether at work, at the store, or even in their own home, most PC users have a standard mid-sized tower sitting on or near their desks.
In order to shrink their footprint, the average SFF PC usually necessitates some other compromise in architecture or support, and heat is always an issue with core components running so close together. Most of these issues have been ironed out over time, except one: future upgradeability. Almost all current SFF PCs use custom motherboards designed to fit only in their cramped confines and are thereby limited in how long they can retain their top-of-the-line status. If a new chipset or CPU arrives, there's little one can do except perhaps go out and buy a next-gen unit from the same manufacturer.
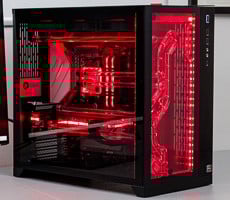
This dilemma might be changing soon, however. Over the last couple of weeks, we have exclusively had the chance to preview a new small form factor PC called the GT3, from GTR Tech Corporation. Unlike the boxy little designs that we have become accustomed to in the SFF arena, the GT3 is sleeker and more versatile; looking more like a slimmer, shorter version of an upright mid-tower.
|
|
|
|
Specifications
. Model Number: GT3-BH . Case Type: Sport Compact PC . Material: Aluminum, ABS Plastic, Stainless Steel . Color: Black and Grey . Finish: Black-Die Anodized Polished Aluminum . Net weight: 7.7 lbs. (includes power supply unit) . Dimensions (H*W*D): 15.6"x4.25"x12.5" . Handle Type: ABS Plastic with Steel Frame Cooling System . Front (Upper Intake): 80x80x20mm Ceramic Bearing, 2000RPM, 23.8 dB, 23.34CFM . Front (Lower Intake): 92x92x25mm Ceramic Bearing, 2000RPM, 25.9 dB, 41.71CFM . Top (PSU Intake): 80x80x20mm Ball Bearing, variable RPM and CFM Power Supply Unit . 350W ATX 12V V2.0 with active PFC . Input: 120V AC . EMI Certified: FCC, CE, BSMI, C-tick . Safety Certified: TUV, UL, CB, BSMI . Power Plug: USA Front Panel . 4x USB 2.0 Ports . 1x Mic-In Jack . 1x Headphone-Out Jack . 1x Power-On Button with integrated power LED (Blue) . 1x HDD Activity LED (Red) . 1x GT3 Logo lit with integrated LEDs (Blue) Drive Bays . Accessible: (1) 1x Slim-line CD . Hidden: (2) 1+1x 3.5" Hard Drive Bays Add-In Cards Supported . One Double Slot VGA, One PCI* . One Single Slot VGA, Two PCI** Expansion Slots . 1x Slim-line CD Motherboard Support . Micro ATX, Standard ATX |
Package Contents
. 1x Double-Slot PCI-Express x16 Riser . 1x One-Slot PCI Riser . 1x Slim-CD Adaptor . 2x Front Panel USB Connector . 1x Front Panel Audio/Mic Header . 1x GT3 LED Header . 1x Power Cord . 1x Manual Warranty . Power Supply Unit: 3 year limited warranty . Riser Cards: 1 year limited warranty . Upper and Lower Intake Fans: 3 year limited warranty * Default GT3-BH Configuration ** with optional 2 slot PCI riser kit ;) GT3-BH PC |
;)
;)
;)
Feature Module HDD/SlimCD Module SlimCD Adaptor
;)
;)
;)
PCI-Express Riser Card PCI Riser Card The Ubiquitous Screwdriver
The GT3 ships in a non-descript, white cardboard box, devoid of any flashy graphics or advertisements. When asked about this, Sean Hall from GTR Tech was blunt - "Would you rather spend money on a box, or on features that the customer wants?" It appears that they have gone with the latter, and may go back later to create a better looking package should they hit the retail market, where many a buying decision is made based on style rather than substance. Other than the GT3 itself, the box contents include items that are entirely centered on building a new system from the ground up, with a few components that are familiar to owners of any new chassis, but some solely geared for the GT3's cramped quarters.
In order to cover just about every scenario that the GT3 can support, a convertible cage called the Feature Module sits above the expansion slots on a motherboard. There's too much to cover here regarding its setup so we will get back to discussing it later, but there are riser cards for both a PCI-Express video card as well as a single PCI-based card that can be installed into the Feature Module. To keep its profile, slim-CD/DVD drives are expected to be installed, and a conversion kit is provided in the bundle as well. A full assortment of screws (no felt spacers though), a screwdriver and a standard power cable round out the included goodies. One might scoff at the relatively unassuming screwdriver at first, but it definitely will make life easier in the future to keep this perfectly sized-tool close by, especially when reconfiguring the Feature Module.