|
|
| Introduction and the Intel P965 Chipset |
When Intel unleashed the Core 2 back in July, they introduced the P965 as their mainstream chipset, while the 975X Express chipset was upgraded with Core 2 support to cover the high-end enthusiast segment. However, the P965 didn't end up being 'just' a mainstream product. As production boards utilizing the P965 chipset began to appear in droves, the enthusiast crowd quickly realized that it was more than just a mid-range chipset when it came to performance. Several manufacturers also took the initiative and beefed up their P965 boards with impressive feature sets that exceed those found on some high-end 975X Express boards. Today we will be evaluating two performance oriented P965 boards from two companies that have traditionally occupied very different market positions. Gigabyte's GA-965P-DQ6 and Abit's AB9 Pro are both aimed squarely at the enthusiast crowd. These two companies with wildly different pasts are now vying for the same piece of the enthusiast pie, but from different ends. Gigabyte is coming from the high-end with the DQ6, packed with features galore, while Abit is coming from the budget segment with the AB9 Pro, a no-nonsense overclocker. Before we get down to the business at hand, lets take a quick tour of the P965 chipset and see exactly what sets it apart from the familiar 975X Express.
Intel P965 Chipset Overview The first, and most obvious difference between the P965 and its older brother is price. P965 boards can be found occupying the mid-$100 price range. Cheaper boards can be found for as low as $100 and some of the more fully featured P965 boards break the $200 mark. 975X Express boards, on the other hand, start at $150 and can cost as much as $300. The two boards we are looking at today occupy the P965's mid to upper price range. 
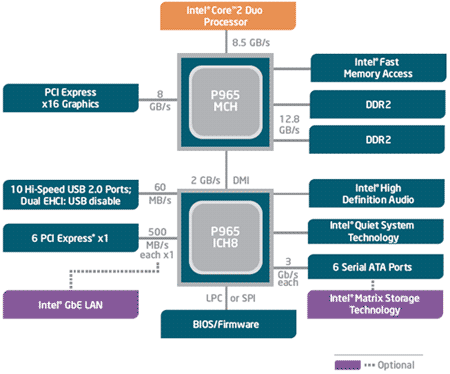
While the 975X Express technically has superior PCI Express support, the P965 boasts several features not found on the 975X, as well as a significantly lower price tag. The most notable addition, when it comes to performance, is official support for DDR2-800. While the 975X officially supported DDR2-667 initially (later revisions added DDR2-800 support), the P965's memory controller was designed to handle DDR2 memory running at speeds up to 800MHz out of the gate. This gives the P965 a 2.1GB/sec theoretical memory bandwidth advantage over the 975X when the latter is running at DDR2-667 speeds. DDR2-800 gives the P965 a theoretical peak memory bandwidth of 12.8GB/sec. The most dramatic difference between the P965 and its older brother is in its South Bridge. The P965 boasts the brand new ICH8 South Bridge while the 975X utilizes Intel's older ICH7. The ICH8 is all about more features. Where the ICH7 supported four SATA drives, the ICH8 supports six. While the ICH7 supported eight USB 2.0 ports, the ICH8 supports ten. Another difference between the ICH8 and its older sibling is the focus on serial ATA support. In fact, parallel ATA support is missing from the ICH8 altogether. Starting with the ICH6, Intel has been trying to de-emphasize PATA. Unfortunately, optical drive manufacturers have not been very keen on using SATA and PATA is still found on the vast majority of optical drives. Most manufacturers include a third-party PATA controller on their P965 boards to remedy this issue. While the P965 tops the 975X in several areas, there is one troubling fault that will plague some enthusiasts. As previously mentioned, the P965 lacks in the multi-GPU department. Until recently, those of us who wanted Crossfire support had to stick with the older 975X chipset. This was because the P965 specification doesn't include support for several features essential to the operation of a Crossfire setup. With the release of Catalyst 6.9, it is now possible to run a Crossfire setup on a P965 board with two PXCI-E x16 slots by using the Crossfire dongle. However, a Crossfire capable BIOS is required for the P965 board and current manufacturer support is spotty. As some early reports reveal, even if you do manage to get Crossfire to work on a P965 board, it currently only works in Direct3D applications and the performance still isn't quiet up to par with a similar setup on a 975X board. Overall, the P965 and 975X Express chipsets are very similar. The two also perform similarly, except when it comes to Crossfire. However, word is that Catalyst 6.10 will close the performance gap and add OpenGL support, turning the P965 into a Crossfire-ready solution. But for the time being Crossfire is still primarily in the 975X's realm and the 975X's main advantage over the P965. Even with that advantage it's not hard to see that the P965 is a great value. If P965 gets comparable Crossfire support, there won't be much reason to fork over the extra $50-$100 for a 975X Express board at all. |
| GIGABYTE GA-965P-DQ6: Specifications & Features | ||||||||||||||||||||||||||||||
Gigabyte's current strategy for Intel based boards is to focus on the P965 chipset and not the Core 2 capable refresh of the 975X Express. As a result they have created a wide range of P965 based products and the GA-965P-DQ6 is the flagship model. With the DQ6, they took the P965 and mated it with a slew of high-end features. The result is a fully featured motherboard and it's quite the overclocker too.
The DQ6's spec sheet is packed and includes all the features one would expect from a high-end motherboard. The Special Features section of the spec sheet stands out. What exactly are the "6-Quad Features" and the "Intel S-series Features" you ask?
GA-965P-DQ6 Unique Features The DQ6 is Gigabyte's first 6-Quad series motherboard. As the name suggests, the 6-Quad feature set consists of six elements. Despite Gigabyte's marketing department's efforts at stretching some of the features to fit them with a "quad" label, we thought that many of them have some practical application. 6-Quad Features
While some of the 6-Quad features are fairly mundane, we found the DQ6's power management and expandability quite impressive. Support for quad core processors future-proofs the board a bit. All 6-Quad motherboards are also part of Gigabyte's S-series. The S-series has four S-features, which 6-Quad boards also have. S-Features
In addition to the 6-Quad and S-Series features, the DQ6 also boasts solid capacitors throughout as opposed to the electrolytic capacitors traditionally used on motherboards. Solid capacitors last longer than traditional electrolytic capacitors and they also contribute to better system stability under extreme conditions. |
| GIGABYTE GA-965P-DQ6: Board and Bundle |
Upon initial inspection, the GA-965P-DQ6 appears to be a very busy board chock full of chips, capacitors and vibrantly colored connectors. The DQ6 is a very cramped board due to the sheer amount of components covering its every surface. Our eyes were immediately drawn to the large full-copper Quad Cooling heatsinks. Combined with large aluminum solid capacitors, the slick looking heat-pipe setup gives the board a high-end, tweaked, and powerful look. This board should feel right at home in a modder's case under the glow of cold cathode lighting. Though very impressive, we question the necessity of such a huge heatpipe system. Overall, the GA-965P-DQ6 is a well laid out design free of any show stoppers. The DQ6 uses a 24-pin ATX power connector to supply its primary power. It also has an 8-pin secondary power connector located between the LGA-775 socket and the I/O header which is used primarily to supply power to the processor. The secondary power connector accepts either a 4-pin or 8-pin ATX12V power source, depending on your power supply and processor's requirements, although an 8-pin can always be used and is highly recommended. An additional 4-pin molex power connector that can be optionally used to satisfy particularly power hungry video cards is located next to the 24-pin primary power connector. The slew of power connections shows that the DQ6 is ready to supply as much power as your system's components need. As previously mentioned, the ICH8 South Bridge used in the P965 chipset supports up to six SATA drives. However we can clearly see that there are two additional SATA ports on the board itself, making a total of eight SATA ports. These two additional ports are driven by a Jmicron JMB363 controller chip, which has 'Gigabyte SATA2' printed on it. The JMB363 uses a PCI Express X1 lane to provide support for two 3Gb/s SATA drives and one ATA/133 IDE channel supporting two drives (master and slave). The additional SATA ports are meant to be used with the eSATA headers included in the package. Gigabyte has color coded nearly every part of the board to make identification and installation easier. The SATA ports controlled by the ICH8 are orange while the ports controlled by the JMB363 are in purple. The PCI Express, RAM and several of the connectors on the external I/O panel are also color coded. Gigabyte even color coded the pins used by the power button, reset button and case LEDs. Small touches like color coding shows a significant amount of thought on Gigabyte's part and really adds polish to this board's presentation. Considering the vast number of components and connectors on the DQ6's PCB, it's not surprising that there are a couple minor layout issues, many of them caused by the huge heat-pipe system. While Gigabyte has left an acceptable amount of room around the LGA-775 socket to accommodate large after market cooling solutions, the 'Crazy Cool' copper plate under the socket creates a clearance problem. It's not uncommon for larger after market cooling solutions to require a back-plate to be attached to the back of the motherboard to provide additional support. Although the back-plate can be placed against the 'Crazy Cool', the screws provided to mount the back-plate may not be long enough to accommodate the additional space required to clear the 'Crazy Cool'. Another minor gripe is the placement of the IDE connector near the bottom of the motherboard. Users with tall cases may have their optical drive(s) located high up, well above the motherboard. This means that the included IDE cable will probably be too short to reach the drives. This is an unfortunate oversight since one of Gigabyte's primary motivations for including an IDE controller was to support the PATA optical drives which currently dominate the market. The biggest layout problem is caused by the size of the Northbridge heatsink and the location of the first PCI-E X1 slot. The first PCI-E X1 slot is much too high on the motherboard. It is directly in line with the Northbridge and a regular sized expansion card will be long enough to bump into the Northbridge's large copper heatsink. The lack of clearance renders the first PCI-E X1 slot useless, unless you have an extremely short PCI-E card. This layout issue means that the board effectively has two usable PCI-E X1 slots. However, most boards this size only incorporate two PCI-E X1 slots so the fact that the first PCI-E X1 slot is nearly unusable isn't a huge loss. The last issue we had with the DQ6's layout is a very common one seen on many boards from a wide variety of manufacturers over the years. Starting way back in the hay day of the AGP interface, many manufacturers made the mistake of placing the APG slot too close to the DIMM slots. This resulted in larger video cards butting up against the end of the DIMM slots, preventing the DIMM locking levers from opening when the video card was in place, and in some cases, preventing the mounting of certain video cards entirely. This common layout mistake has been carried over to PCI-E slots and the DQ6 is one of the latest offenders. Luckily this usually does not effect the functionality of the motherboard, DIMMs or the video card. It's just annoying to remove the video card whenever DIMMs need to be inserted or removed. The GA-965P-DQ6 was packaged with a slew of accessories and reading material. Included is a manual, guide on how to connect the motherboard with the rest of the system, and a sheet on how to install the processor. Also included was a Gigabyte case badge. The bundled accessories include an IDE cable, floppy disk cable, four internal SATA cables, two eSATA headers, two external eSATA cables, and two molex-to-eSATA power cables. Lastly, an I/O shield and driver CD is included in the package. We wish a RAID driver disk was also included. The CD has a wide variety of software, as well as the necessary drivers and Gigabyte's proprietary utilities. The software bundle includes Norton Internet Security suite, Adobe Acrobat Reader v6.01, Gigabyte's EasyTune 5, Gigabyte's C.O.M. system management utility, and Yahoo! toolbar. |
| GIGABYTE GA-965P-DQ6: BIOS and Overclocking | ||||||||
The Gigabyte GA-965P-DQ6 uses an Award BIOS that is very comprehensive and packed with features. Like many other Award BIOS', this one is easy to navigate and well laid out. From within the BIOS, users have the ability to configure, enable or disable all of the board's various integrated peripherals, and can monitor fan speeds, voltages and clock speeds.
The GA-965P-DQ6's BIOS is an overclocker's dream. Contained within the MB Intelligent Tweaker (M.I.T.) menu is just about every option you would need to push your system to its limits. Like certain other Gigabyte motherboards, many of the more advanced options are not initially available. These hidden options can be accessed from the M.I.T. after pressing CTRL+F1 in the main menu. The GA-965P-DQ6 allows the user to manipulate the CPU multiplier, although you are limited to decreasing the multiplier unless you have an unlocked processor. The front side bus frequency can be adjusted in 1 MHz increments, from 100 MHz to as high as 700 MHz. PCI-E express frequency can also be adjusted, from 90 MHz to 150 MHz. The memory multiplier has seven settings to allow the memory to run at an assortment of frequencies and detailed DRAM timing adjustments are also available. The BIOS also offers thorough voltage adjustments. The CPU voltage can be adjusted from as low as 0.6875V to as high as 2.375V, in 0.00625V intervals. DIMM, PCI-E, FSB and MCH voltages can also be increased. An additional 0.775V can be added to the DIMM voltage at 0.025V intervals, while PCI-E, FSB and MCH voltages can all be increased by as much as 0.35V in 0.05V intervals. In addition to the comprehensive set of manual settings, the M.I.T. menu also offers three different automated settings. Memory performance and graphics card bandwidth can both be toggled between normal, fast and turbo settings. The GA-965P-DQ6 has a built-in automated CPU overclocking feature called CPU Intelligent Accelerator 2 (C.I.A.2) that can be accessed from within the M.I.T. The C.I.A.2 utility is designed to detect CPU loading during computer use and automatically adjust the CPU's speed to maximize system performance. The C.I.A.2 has five levels of aggressiveness; cruise, sports, racing, turbo and full thrust.
We took a Core 2 E6400 processor and set out to see if the GA-965P-DQ6's impressive settings could amount to equally impressive overclocking results. We loaded the BIOS' optimized defaults, then increased the FSB as far as we could go. The frequency of our Corsair TWIN2X1024-8500 modules were kept as close to their rated speed of 1066MHz as possible by adjusting the BIOS' memory multiplier settings. Ultimately, we were able to take our E6400 CPU to 3.12 GHz, by raising the FSB to 390 MHz and running our RAM at 1037 MHz. This is the highest speed our system was able to handle with perfect stability. Tempted by curiosity, we then took our E6400 to 3.6 GHz on stock cooling with a FSB of 450 MHz and a 0.15V increase. Although we were able to boot into windows at this speed, we weren't able to stay there very long since our system was terribly unstable. Considering the E6400's rated speed of 2.13GHz, our stable overclock of 3.12 GHz on stock cooling and voltages is very impressive. I am sure that a much higher stable overclock could have been achieved with more potent cooling, but that is out of the scope of this article. |
| Abit AB9 Pro: Specifications & Features | ||||||||||||||||||
Abit took a different route than Gigabyte for their Intel based boards. Instead of focusing on the P965 chipset, Abit has created a full range of 975X Express and P965 products. Their flagship motherboard is the AW9D-MAX, a decked out 975X Express board with Core 2 support (we'll have a review posted shortly). Today we'll be looking at the Abit AB9 Pro. While it's not Abit's flagship board, it's the top of their line of P965 boards and if you ignore the lack of a second PCI-E x16 slot, the AB9 Pro is actually better specified than the AW9D-MAX! The AB9 Pro has a lot of nice features packed into it like onboard dual gigabit LAN, Abit's uGuru technology and more SATA ports than you'll likely ever need.
While the GA-965P-DQ6's eight SATA ports was impressive, you won't be disappointed by the AB9 Pro as it supports up to 10 SATA devices. The AB9 Pro has nine SATA ports on the board itself and an additional eSATA port on its I/O panel. The AB9 Pro loses when it comes to PCI-E slots, however. With support for only one PCI-E X16 slot and two PCI-E X1 slots, it falls behind the DQ6 by a total of two slots. While the DQ6 had Gigabyte's 6-Quad and S-series feature sets, Abit has given the AB9 Pro their SoftMenu, uGuru and Silent OTES technologies.
While we now take CPU frequency and voltage adjustments in the BIOS for granted, it was Abit that pioneered the idea. Softmenu was one of the first jumperless CPU configuration systems to appear on a motherboard. Before it, many adjustments required for overclocking had to be done via jumpers. Since its inception, SoftMenu has been a staple feature on Abit boards and copies of its concept can be found in the BIOS of just about every modern enthusiast motherboard.
Abit uGuru Chip Abit extended their SoftMenu idea and the result was uGuru. uGuru is a custom microprocessor that, in conjunction with Abit's software utilities, allows the user to modify system settings and monitor system status in real-time from within the operating system. The dedicated uGuru chip allows all of this to be done with zero CPU utilization. The ability to modify and monitor system settings like frequency and voltages in real time greatly simplifies the process of overclocking. Being able to do all of this from within Windows means that finding an optimal overclock no longer requires rebooting the system a hundred times to get into the BIOS for more tuning. The AB9 Pro is outfitted with the latest uGuru chip, located at the bottom of the board, under the main group of SATA ports. Included on the driver CD are four utilities designed to take advantage of the uGuru's capabilities.
All told, the uGuru's features are quite helpful and can save you a lot of time. The OC Guru utility is especially useful and the EQ utility is a great alternative to traditional in-OS hardware monitoring methods, especially since it uses almost no CPU cycles.
Silent OTES Heatsink In 2004, Abit introduced the OTES cooling system. This is a heat pipe based cooling system designed to transfer heat from the chipset and voltage regulators and expel it out of the system through slots in the rear I/O panel. The AB9 Pro makes use of a fan-less passive version this system, hence the addition of "Silent" to the name. |
| Abit AB9 Pro: Board and Bundle |
Compared to the DQ6, the AB9 Pro is less flashy, lacking the DQ6's huge copper heatsinks. It's also a bit more color coordinated. The AB9 Pro's bright blue Silent OTES cooling system contrasts against the orange PCB, catching your eye immediately. The AB9 Pro has a total of five heatsinks covering the voltage regulators, northbridge and southbridge. However, only two of these heatsinks are connected via heatpipes. Contrary to what you might expect, the largest heatsink is not on the northbridge. Instead, it covers some voltage regulators near the rear I/O panel. It is connected to the small northbridge heatsink by a fluid filled heatpipe. The idea is that the heat produced by the northbridge will be transferred to the large heatsink where it can be expelled from the system via vents on the I/O shield. Unlike the DQ6, the heatsinks on the AB9 Pro are well located and unobtrusive. This is mostly thanks to the low profile of the north and southbridge heatsinks. The AB9 Pro uses a 24-pin ATX connector and a 4-pin ATX12V connector to provide its power. Both power connectors are conveniently located on the left edge of the board. The AB9 Pro's documentation states that a 20-pin connector may be used in the 24-pin port, although stability may be compromised. However, the board will refuse to boot if the 4-pin ATX12V power connector is missing. Like the DQ6, a molex port is provided on the board which can optionally provide additional juice to especially power-hungry graphics devices. The molex port is located under the CPU, near the left edge of the board. This could result in minor cable routing problems. The I/O panel of the AB9 Pro appears a bit barren, something just seems missing. That's right, the AB9 Pro has no legacy connector support. Parallel and serial ports are no where to be found. Where the parallel port usually sits is now a pass-through for the large OTES heatsink. The area directly under, traditionally occupied by serial port(s), now houses an eSATA port and two optical S/PDIF ports. The lack of legacy connectors may be inconvenient for those of us who still need them for older devices but it shouldn't be a huge setback in this day and age of USB domination. Firewire ports are also missing from the AB9 Pro's rear I/O panel, however two firewire connectors can be found on the board itself. They are meant to be used with the USB/Firewire header included with the board. There are also additional USB connectors on the board, allowing for another six USB ports, which can be used by the included header and/or to connect USB ports on the front of the case. In order to drive all ten of its SATA ports, the AB9 Pro uses two SATA controllers in addition to the ICH8R's built-in functionality. The same JMicron JMB363 used by the DQ6 controls the AB9 Pro's IDE channel and two of its SATA ports. The ICH8R controls six SATA ports and a Silicon Image 3132 chip is used to drive the eSATA port on the rear I/O panel and the last SATA port. The six SATA ports controlled by the ICH8R are located in a cluster near the bottom-right of the board, similar to the DQ6. We like this position since its conveniently near the area where most cases have their hard drive bays. While it's great that there are so many SATA ports available on the AB9 Pro, the placement of some of them is a bit awkward. The two ports controlled by the JMB363 and the single port controlled by the Silicon Image are located on the left side of the board. This is a bit inconvenient since the drives they are meant to connect to are usually located off to the right of the board. However, this isn't a huge problem given the sheer amount of SATA ports to choose from. The placement of the JMB363 and the IDE connector presents a layout problem. They sit right where we wished a PCI-E X4 slot was. The AB9 Pro suffers from a strange layout anomaly involving the placement of the IDE and floppy connectors. The IDE connector is placed between the PCI-E and PCI slots while the floppy drive connector is at the very bottom of the board, crammed against the lowest PCI slot. The location of the IDE connector is inconvenient since most users will need it to connect their optical drives which are usually located around the top-right edge of the board. This is especially true for full-tower cases, where the optical drives are often above the board. This problem is amplified when expansion cards are installed in the PCI-E slots, since the cable would need to be long enough to clear them. A similar problem occurs with the floppy connector. We installed the AB9 Pro into a standard mid-tower case and using the included IDE cable, we were just barely able to connect an optical drive installed in the top 5.25" bay when a PCI-E X16 card was installed. With a PCI-E X1 card installed, the cable isn't long enough to reach the top bay. A similar problem occurs when the included floppy cable is used to connect a floppy drive while there are PCI cards installed. While the placement of the IDE and floppy connectors is irritating, it's certainly not a show stopper. Fortunately, the AB9 Pro does not suffer from DIMM slot clearance problems and RAM may be installed/removed without first removing the PCI-E X16 card. The AB9 Pro's bundle includes a generous nine SATA cables. Also included are a USB/Firewire header, IDE cable, floppy cable, I/O shield, driver CD and four RAID driver diskettes. The disks are for installing the drivers for the SATA controllers and RAID functionality. This must be done when installing the OS. The USB/Firewire header supports two USB 2.0 ports, a 6-pin Firewire port, and a 4-pin Firewire port. Also included in the bundle is a bunch of reading material including a quick installation guide, user manual, uGuru manual and a jumper settings sticker. Noticably absent is an Abit case badge. The driver CD includes a digital copy of the user manual in Adobe pdf format, Adobe Reader to view said manual, uGuru software and other Abit proprietary utilities as well as, well...drivers. |
| Abit AB9 Pro: BIOS and Overclocking | ||||||||
I'm sure your unconsciously eyeing the set of BIOS images below so lets get a few things out of the way before we start digging into the AB9 Pro's BIOS. Besides cropping we have not altered the images in anyway, you haven't gone color blind, your monitor isn't broken, our monitor isn't broken, our video card works fine and so do our digital cameras. Yes, that's right, the AB9 Pro's BIOS background is bright pink. And no, we don't know why Abit chose that color either.
The AB9 Pro uses a Pheonix/Award BIOS similar to the DQ6's Award BIOS from the main menu, but that's where the similarities stop. Overall the BIOS is well laid out and simple to navigate. However, we liked the DQ6's BIOS slightly more because it was a bit more linear. It takes a couple minutes to find everything in the AB9 Pro's BIOS, especially if you skip the whole 'read the manual' thing. Instead of the M.I.T. menu, the AB9 Pro has a uGuru menu for all your overclocking needs. While it's not as comprehensive as the M.I.T., all the essentials are there. The uGuru menu is divided into two sub-menus; OC Guru and ABIT EQ. The ABIT EQ is where you can monitor your PC's temperature, fan speeds, voltage and set temperature and fan alarms. The OC Guru menu contains all of the overclocking options. However, you won't find the RAM timing adjustments here, for that you'll have to go to the 'Advanced Chipset Features' menu. The OC Guru menu lets you set the front side bus frequency anywhere from 133 MHz to 600MHz, in 1 MHz increments. The DRAM to FSB ratio can be set between 1:1, 4:5, and 2:3. The PCI-E clock can be adjustment from 100MHz to 200MHz in 1 MHz increments. Noticeably missing is the CPU multiplier adjustment, although the current multiplier is displayed. In addition to the previously mentioned frequency adjustments, the CPU, DIMM, MCH and ICHIO voltages can all be adjusted from the main OC Guru menu. The CPU voltage can be adjusted from 1.325V to 1.725V in 0.025V increments, while the DIMM voltage can be adjusted from 1.75V to 2.50V in 0.05V increments. Both the MCH and ICHIO voltages can be adjusted between 1.25V and 1.45V in 0.05V increments.
Just like with the DQ6, we took a Core 2 E6400 processor and set out to see if the AB9 Pro's uGuru overclocking features and overclocking heritage would amount to equally impressive overclocking results. We loaded the BIOS' optimized defaults, then increased the FSB as far as we could go. The frequency of our Corsair TWIN2X1024-8500 modules were kept as close to their rated speed of 1066MHz as possible by adjusting the BIOS' memory multiplier settings. Despite high expectations, our AB9 Pro let us down. We were able to take our E6400 CPU to 2.88GHz, by raising the FSB to 360MHz and running our RAM at 900MHz. This is the highest speed our system was able to handle with perfect stability. Raising the FSB further prevented us from even getting into windows. While a 750MHz overclock is modest compared to the DQ6's 990 MHz, it's still very healthy especially considering all voltages were at stock levels. |
| Test Systems and SiSoft SANDRA | ||||||||||||||||
How we configured our test systems: When configuring our test systems for the following set of benchmarks, we first entered their respective system BIOSes and set each board to its "Optimized" or "High-Performance Defaults." We then saved the settings, re-entered the BIOS and set memory timings for DDR2-800 at 4,4,4,12 1T latency. The hard drives were then formatted, and Windows XP Professional SP2 was installed. When the Windows installation was complete, we installed the drivers necessary for our components, and removed Windows Messenger from the system. Auto-Updating and System Restore were then disabled, and we set up a 768MB permanent page file on the same partition as the Windows installation. Lastly, we set Windows XP's Visual Effects to "best performance," installed all of our benchmarking software, defragged the hard drives, and ran all of the tests.
We began our testing with SiSoftware's SANDRA, the System ANalyzer, Diagnostic and Reporting Assistant. We ran three of the built-in subsystem tests that partially comprise the SANDRA 2007 suite (CPU, Multimedia, and Memory) with the Gigabyte GA-965P-DQ6, Abit AB9 Pro and our Core 2 Duo E6400 processor. All of the scores reported below were taken with the processor running at its default clock speed of 2.13GHz.
For all three tests, the AB9 Pro managed to outpace the DQ6, although the difference is negligible. The AB9 pro manages to pull ahead by 2% on the memory and multimedia tests but the two boards post nearly identical scores in the CPU arithmetic test. |
| PCMark05 CPU and Memory Benchmarks | |||||
For our next round of synthetic benchmarks, we ran the CPU and Memory performance modules built into Futuremark's PCMark05. For those interested in more than just the graphs, however, we've got a couple of quotes directly from Futuremark that explain exactly what these tests do and how they work.
"The CPU test suite is a collection of tests that are run to isolate the performance of the CPU. The CPU Test Suite also includes multithreading: two of the test scenarios are run multithreaded; the other including two simultaneous tests and the other running four tests simultaneously. The remaining six tests are run single threaded. Operations include, File Compression/Decompression, Encryption/Decryption, Image Decompression, and Audio Compression" - Courtesy FutureMark Corp.
Just like with SANDRA, the PC Mark 2005 scores don't show much of a difference between the two boards. Having said that, we once again we see the AB9 Pro pull slightly ahead of the DQ6. This time by just over 3%.
"The Memory test suite is a collection of tests that isolate the performance of the memory subsystem. The memory subsystem consists of various devices on the PC. This includes the main memory, the CPU internal cache (known as the L1 cache) and the external cache (known as the L2 cache). As it is difficult to find applications that only stress the memory, we explicitly developed a set of tests geared for this purpose. The tests are written in C++ and assembly. They include: Reading data blocks from memory, Writing data blocks to memory performing copy operations on data blocks, random access to data items and latency testing." - Courtesy FutureMark Corp.
Although SANDRA showed the AB9 Pro as a bit faster when it comes to memory, PC Mark 2005 has both boards posting nearly identical numbers. This isn't surprising since both boards were configured with identical DDR2-800 modules set to 4-4-4-12-1T timings. Once again the AB9 Pro beats the DQ6 ever so slightly. |
| WorldBench Office and Photoshop Benchmarks | ||||
PC World Magazine's Worldbench 5.0 is a new breed of Business and Professional application benchmark, that has replaced the aging and no-longer supported Content Creation and Business Winstone tests in our suite. Worldbench 5.0 consists of a number of performance modules that each utilize one, or a group of, popular applications to gauge performance.
Below we have the results from WB 5's Office XP SP2 and Photoshop 7 modules, recorded in seconds. Lower times indicate better performance here, so the shorter the bar the better.
The trend continues as the DQ6 once again comes in second in both the WorldBench Office XP and Photoshop tests. As before, the difference between the two boards is barely noticeable. Practically, you would never notice the difference between the two boards in everyday use of either Office or Photoshop. |
| WorldBench Multi-task and MP3 Encoding | ||||||||
We continued our comparison of the AB9 Pro and DQ6 motherboards with a Windows Media Encoder benchmark that is is also part of the Worldbench 5.0 suite, a video is encoded using Windows Media Encoder, while an instance of the Mozilla browser is also running and navigating through various cached pages. Because the system is multi-tasking with two different applications, this test is more taxing and representative of a common multitasking end user experience.
Staying consistent with the previous two WorldBench tests, the two boards post scores within 5% of each other. The 14 seconds the AB9 Pro manages to shave off of the DQ6's time is a bit more than what we saw before.
In our custom LAME MT MP3 encoding test, we convert a large WAV file to the MP3 format, which is a very popular scenario that many end users work with on a day-to-day basis, to provide portability and storage of their digital audio content. In this test, we created our own 223MB WAV file (a never-ending Grateful Dead jam) and converted it to the MP3 format using the multi-thread capable LAME MT application in single and multi-thread modes. Processing times are recorded below. Once again, shorter times equate to better performance.
The DQ6 just can't catch a break, as the AB9 Pro wins again, in both the single-threaded and multi-threaded tests. The 1-2 second difference between the two boards doesn't seem like much but it could add up if your in the habit of encoding huge amounts of MP3s in one go. |
| Cinebench and 3DMark06 CPU Benchmarks | ||||||||
The Cinebench 2003 benchmark is an OpenGL 3D rendering performance test, based on the commercially available Cinema 4D application. This is a multi-threaded, multi-processor aware benchmark that renders a single 3D scene and tracks the length of the entire process. The time it took each test system to render the entire scene is represented in the graph below (listed in seconds).
The two boards are once again neck and neck, with the AB9 Pro taking the lead, barely. The 1.5 seconds the AB9 Pro manages to shave off the DQ6's multi-threaded score is shorter than the average time between blinks. Hardly a significant difference.
3DMark06's built-in CPU test is a multi-threaded "gaming related" DirectX metric that's useful for comparing relative performance between similarly equipped systems. This test consists of two different 3D scenes that are generated with a software renderer, which is dependant on the host CPU's performance. This means that the calculations normally reserved for your 3D accelerator are instead sent to the central processor. The number of frames generated per second in each test are used to determine the final score.
Finally, the boards post scores that have a difference larger than 3%. Similar to the PC Mark 2005 scores, the two boards are separated by about a hundred points in our 3D Mark 2006 test. |
| Game Testing: Quake 4 | ||||||||||
For our first gaming test, we benchmarked both of the test systems using a custom single-player Quake 4 timedemo. Here, we installed the v1.2 patch which is SMP capable, dropped the resolution down to 640 x 480, and configured the game to run at its "Low-Quality" graphics setting. Although Quake 4 typically taxes today's high-end GPUs, when it's configured at these minimal settings it too is more CPU and memory-bound than anything else.
More of the same, as the DQ6 once again gets edged out by the AB9 Pro. The GeForce 7900 GT used in both of our test systems manages a healthy frames rate of just over 167 frames per second. Then, to see how the two boards would fare in a typical high-end gaming scenario, we also tested it with Quake 4 at high-resolution settings that tax the graphics sub-system of each of our test machines.
While the 50ish frames per second the single GeForce 7900 GT was able to push isn't as impressive as the near 100FPS that a multi-GPU setup would be able to do, it's still very playable. In our last test, the AB9 Pro continues to best the DQ6, not letting up for a single benchmark. |
| Our Summary and Conclusion | ||||||||
Benchmark And Performance Summary:
While both motherboards fared about the same when it came to performance, they differ some when it comes to features and price. Gigabyte's GA-965P-DQ6 and Abit's AB9 Pro are both meant to be high performance enthusiast boards, and it shows, but they are targeted for different price points. With respect to overclocking and stability, the DQ6 performed extremely well. Not only does it have one of the most comprehensive set of overclocking options we've seen on a motherboard, it also has the overclocking capability to back it up. The nearly 1GHz overclock we were able to achieve with our particular DQ6 is impressive. No doubt, the DQ6's 12-phase power array played a role here, keeping the processor supplied with steady power. Stability was top notch. We ran our DQ6 at its peak stable overclock for several days without a restart, putting it through stress test after stress test and it has yet to falter. Gigabyte DQ6: The comprehensiveness of the DQ6's features doesn't end with overclocking options. It crams more onto its standard ATX PCB than many other P965 boards, sporting a grand total of seven expansion slots (although one of the PCI-E X1 slots is nearly useless), four DIMM slots and eight SATA ports. Not to mention the massive passive heatpipe system and all-around solid capacitors. This is definitely one of the best configured P965 boards we've seen. Considering ATi's efforts to bring CrossFire to the P965 chipset, and with quad-core CPUs right around the corner, the DQ6 could get even better in the near future. The DQ6 is packed with features, from its attempt at squeezing as many expansion slots as the PCB will hold to its fancy cooling setup, it is clear that no expense was spared. No where is this more evident than on the price tag. The DQ6 currently costs about the same as certain cheaper 975X Express boards. According to the HotHardware PriceGrabber Engine, you should be prepared to slap down at least $205 if you want a DQ6 of your own. That's a hefty price to pay for a "mid-range" P965 board. However, we believe the DQ6 is worth the price of admission and we're awarding it an 8.5 on the HotHardware HeatMeter.
Abit AB9 Pro: Despite a couple of quirks, like a bright pink BIOS background and perplexing IDE and FDD connector placement, ultimately the AB9 Pro's great functionality and performance shines through. While the AB9 Pro doesn't have as many expansion slots as the DQ6, it fields an impressive ten SATA ports and dual gigabit ethernet ports. Unfortunately it lacks a PCI-E X4 slot so CrossFire support is out of the question, but according to Abit, it will run quad core processors. From cutting out legacy ports to the efficient low profile cooling system, everything about this board screams efficiency. Abit has done a good job of tossing less important features in order to bring the price down while keeping all the goods that an enthusiast would appreciate. This translates into one of the lowest price tags of any P965 board, and it is the cheapest P965 board that uses the ICH8R southbridge, as opposed to the plain ICH8 which lacks RAID, AHCI and native command queuing (NCQ). The HotHardware PriceGrabber has the AB9 Pro for as low as $143. Considering that the AB9 Pro is a well featured, decent overclocker, that's a good deal. While we thought the Gigabyte GA-965P-DQ6 is a great motherboard, it simply can't beat the Abit AB9 Pro's amazing value. This is why we are awarding the Abit AB9 Pro an 9 on the HotHardware HeatMeter and declaring it the winner of this comparison.
|