Building The SHIFT, Maingear's DIY Kit
;)
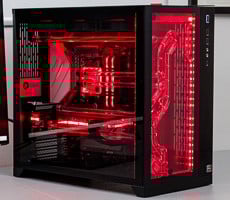
SHIFT's inverted motherboard tray with EPIC 180 installed - 180mm white fan mounted to radiator
The PSU mounts in the bottom of the chassis, right in back of the 180mm fan site in the front of the case where the EPIC 180 radiator can also be mounted. There is another 180mm fan mounted right above where the PSU sits. This fan pulls cool air in from the bottom of the chassis and pushes it out over the motherboard area. As you can see here, the drive rack area is also right above where the EPIC 180 radiator mounts. The drive rack has six drive trays that support both 3.5" and 2.5" hard drives or SSDs. Though we were concerned that the radiated air off the cooler would warm the drive rack, with the white 180mm fan pushing the sort of volume it does over the area, these concerns were unfounded and drives maintained a cool profile. In fact, as you'll see, the litany of system thermal sensors registered nominal readings under load.
;)
;)
Part of the reason the system remained cool and quiet was that the Maingear EPIC 180 self-contained water cooler (developed by CoolIT) is epically huge. The radiator fan shroud is custom fit to slide right in under the drive rack of the chassis and with the fan mounted on it, there is plenty of clearance underneath. This fan, like the 180mm fan above the PSU, also pulls cool air into the system and over the radiator. The cold plate, block and pump assembly of the EPIC 180 is also large and well-built. The kit comes with screw type stand-offs that use thumbscrews to mount the assembly into a standard LGA 2011 type socket.
;)
The motherboard area is relatively tight with strategically placed pass-throughs in various areas. These passthroughs aren't as large as we would have liked, though they are lined with rubber grommets to protect cabling from cuts and chaffing. Working cable routes through these areas takes a bit of work in spots, but ultimately it accommodated our fairly standard configuration, with a modular power supply affording us the ability to only install the cables we need for the build. Heavier build configurations may be a bit more challenging in terms of cable management and routing.