|
|
| Introduction and Specifications | ||||||
Antec offers the Mini-P180 in two flavors: matte black with gunmetal-colored plastic inlays on the side panels and door, or all white, which is a step away from the norm. The side doors are completely unmarked without any windows or ventilation slots. Two thumbscrews keep the left side panel shut, while standard screws are used for the other side panel.
Although designed for micro-ATX boards, the chassis itself is far from miniscule and matches up with other mid-size towers such as Antec's own Three Hundred - the two are nearly identical in height and length. |
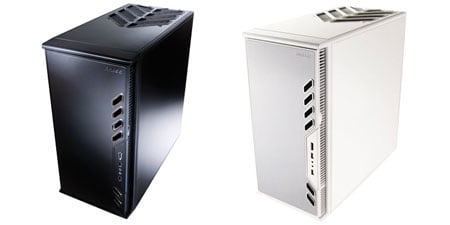
| Antec Mini-P180 Exterior Look |
|
Six diagonal openings, four at the top and two at the bottom, stylize the Mini P180's front door and surround the two USB, eSATA, and front audio jacks. A small notch on the right provides easy access to the large, easily pushed power button and the much less accessible reset button. This button is recessed a bit too far into the plastic frame and requires either the back of a pencil or some determined finger pushing to get an audible "click" when resetting the system. We've seen protective measures used before on other cases to prevent accidental shutdown or restarting, but we believe that Antec took this point just a bit too far especially since the power and reset switches cannot be accessed once the door is closed. The door hinge actually separates from the frame and rotates outward, allowing the door a full 270 degree range of motion, folding back completely against the side panel. The side panels do not have a grip or handle like the Nine Hundred, but slide off easily, and more importantly, grip well when reseating them. A 5 1/4" bay is found at the top of the unit, with two more bays at the very bottom, and two "zones" in between. These zones have slots that allow air intake, especially if fans are mounted behind them, and each comes with a removable and washable air filter fitted in behind the front bezel. Rounded edges on the door keep arms and hands safe from skin-shearing metal, and the horizontal bar separating the two chambers has foam padding to prevent the side door from making metal-to-metal contact within. The doors themselves are constructed of three layers - metal, plastic, then metal again in order to prevent unwanted vibrational noise. Along the rear of the chassis, a 120mm fan is mounted, with four expansion slot openings and, per typical Antec fashion, power supply units get mounted at the bottom. The PSU can be mounted in either orientation, although obviously those with fans on one side should face upwards for optimal cooling effect. A vent is placed nearby with a filter to keep out dust and other particles. The top panel has diagonal vents placed over a honeycomb mesh protecting the 200mm fan underneath - the very same "Big Boy" fan we first encountered with the Nine Hundred last year. Typically seen on SFF PCs, the screw downs for the expansion slots are found on the outside of the chassis, requiring an extra step during installation. |
| Antec Mini-P180 Interior Shots |
The inside of the Mini-P180 features two main zones; the upper chamber will house the motherboard and optical drives, as well as up to five hard drives and the lower one is mainly used to house the power supply unit and two additional 5 1/4" bays. The uppermost bay will fit most newer optical drives, but Antec does warn that size constraints are limited to 170mm or less as they would otherwise hit the fan housing. A sliding door separates the two zones and helps keep cables organized. The entire interior including the removable drive cages are anodized black, which is a nice touch. Silicone grommets under the PSU and in the drive cages limit vibration between the components and the chassis to keep unwanted noise output to a minimum. One doesn't usually expect much in the way of a bundle with a case, but Antec has thrown in a 5 1'4" to 3 1/2" conversion kit to allow floppy drives or card readers to be installed, as well as four tie-downs, 6 rails for optical drives, and the requisite screws and standoffs. One of the drive bays also has a compartment for storing these extra screws and other small items that one might need for later upgrades. Both the rear and top-mounted fans require 4-pin MOLEX power, which we weren't overly keen on (we'd prefer 3-pin plugs that connect directly to the motherboard), but we really liked how the speed controls were worked into the back of the Mini-P180. This allowed for refinement of noise/cooling levels without the opening of the chassis. In the Antec Nine and Three Hundreds, the speed controls dangle on cables and we needed to tuck them in or tie them down to keep them out of trouble within the system, and also required that we open the case to change speeds which can become a hassle. Plenty of room under the motherboard and right side panel allow cables to be routed and tied down, keeping them organized and out of the way of the other components. There are openings near the top, alongside the cages, and in the bottom zone providing unrestricted access to route the cables to each zone accordingly. Cables snake down from the front for the HD Audio, USB, and eSATA (goes into an open SATA port), with power button, reset button, and power LED leads. |
| Installation Notes |
Oversized thumbscrews allow access to the interior of the chassis and expose the chambers within. As expected, in a micro-ATX setup, the compartments are a bit on the cramped side even in an enclosure as large as the Mini-P180. Pulling the cables to one side, we checked that the motherboard standoffs were indeed pre-installed in the correct locations. The rear plate was then fitted directly beneath the rear-mounted fan. The motherboard we’re using for this build – an Intel DG45ID – wouldn't fit in directly and we found that the best way to get it to align correctly with the I/O plate was to remove the lower drive cage and angle the board in towards the back. It really was a tight fit as not only did we need to clear the rear fan mount, but the drive cage separator as well, which is not removable. Overall, there was less than an inch of room to play with. Once in, the board was secured by placing screws into their respective holes, but we left the drive cage out so we could properly run the cables to the headers on the DG45ID--connecting the front panel pins is next to impossible otherwise. The cables were banded together and after separating them, we can see that, thankfully, they are clearly labeled making installation less of a chore. We fed the PSU into the cramped lower quarters sideways, and then tucked the cables into the front bay area. Only cables that were needed to power up components were snaked through the opening between the zones to keep things neat and prevent any restriction to proper airflow in the middle chamber. The hard drive cages are a bit different. To remove them, we undid the thumbscrews and pulled the ring towards the outside of the case. The cages slide easily and fit solidly back in when done, although the positions of the cages cannot be swapped. Drives are mounted vertically in the upper cage using the silicone grommets and the specialized screws provided. Don't over-tighten these, Antec warns, as this would lessen the sound-dampening effects of the grommets. The lower cage is divided into two sections using removable drive trays each with their own set of grommets, and drives go horizontal here. Note than the metal rings have clips to keep them secure, again to prevent any vibrational effects. Optional 120mm fans can be installed using mounts at the front of the Mini-P180 to enhance CPU or VGA cooling. In order to do so, however, one of the drive cages must be sacrificed as they cannot co-exist with a fan in the same bay. |
| Build Summary and Conclusion | ||
Build Summary: The Antec Mini-P180 proved to be a great foundation to build on, with ample cooling, including the huge 200mm “Big Boy” fan placed directly over the CPU area, and mounts for three additional 120mm fans (although only one comes pre-installed). These are aided in their overall performance by dust-reducing air filters and external speed controls for the fans. We’re also impressed by the level of attention Antec gave to reducing unwanted noise. Vibrational noise caused by fans or other components like drives vibrating against the chassis is kept to an absolute minimum with proper use of silicone grommets and a multi-layer door construction. Heck, even the pull-rings used on the drive cages get latched down so they won’t rattle.
Our overall impression of the Antec Mini-P180 was quite favorable, even if the case is more like a full-sized mid-tower than a "mini" as its name implies. The height of the case has been reduced by almost four inches from the original P180, but the width has barely changed, and the depth of the case has actually increased. It still has the great looks of its predecessors with sleek outlines, a double-hinged door, and comes in either the gunmetal grey and black or white color schemes. What really sells the Mini-P180, however, is the cooling performance and low noise output. Combined with the Intel DG45ID we barely heard any sounds coming from our unit during our post-build testing until we added in a more powerful video card for better gaming performance. At about $120, the Mini-P180 isn't cheap, but its high quality construction, near silent operation, and feature set certainly justify the price. Those looking for a quiet and stylish enclosure should definitely look into the Antec Mini-P180.
|