Epox eX5-320S SFF PC
Getting to know Mini-Me

|
;)
;)
;)
;)
;)
;)
;)
;)
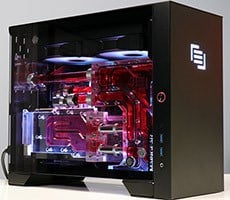
The Epox eX5-320S has the same brushed aluminum look that we've seen with other Small Form Factors PCs. What makes this case so different is the glossy black front with the single LCD screen, and the row of silver buttons along the top edge. It gives the unit a sleek look, obviously portraying its capabilities as a multimedia device rather than just another computer in the house. There's only the two PS/2 ports at the bottom to help recognize it as a PC. There are other PC-centric controls hidden behind a drop-down panel, including audio in and out jacks, 2 USB 2.0 ports, and one FireWire connector. In our opinion, it might have been better to put the PS/2 connections behind here as well, as the green and purple ports take away from the overall appearance of the unit. They could have also been placed on the rear of the system, which is more commonplace. Instead, the back I/O plate had configurable audio jacks including digital and analog S/PDIF connectors, four more USB ports, another FireWire port, a RJ45 LAN jack, and a 15-pin VGA port for the on-board graphics.
Opening the chassis is easily done by unscrewing three thumbscrews and sliding off the outer cover. Most of the cables on the inside were already routed in such a way as to make them unobtrusive. Along the upper most rail where a CD-ROM drive would be installed was one power cable and the end of a rounded IDE cable. There's almost no slack, as the IDE cable seems to be sized just to meet the back of a properly mounted drive. Looking past the cables, we've got a tray that currently holds a card reader with a removable hard drive cage placed underneath. To install/remove the hard drive, there's one screw to remove and then the entire bay can be slid out. Removing the card reader tray proved to be much more of a challenge. Although there were only three screws holding it down, the tray would not slide out easy and we had to rock it back and forth to get it out. Putting in back in was even more troublesome, as it just didn't seem to fit correctly, and with such little room to move around in, it was easy to get frustrated. Luckily, there's little reason to remove this tray unless, let's say, you wanted to install a floppy drive instead of the card reader.
;)
;)
;)
;)
;)
;)
Once the tray was removed, we got a better look at the EP-4PFG motherboard. Looking directly down at the board, we got a clear view at the mPGA478B CPU Socket and the Intel 82865G Northbridge. There's a large black duct placed directly behind the CPU, which is part of the 3G-Tek cooling technology. To keep the CPU cool, an oversized aluminum block heatsink with a copper footing is used. The copper plate absorbs the heat quickly from the CPU, and then transfers it to the aluminum heatsink. Fans placed on either side of the unit force air over the fins in the center of the cooling unit, and disperse the heat through the ductwork and out the back of the chassis. What we especially liked about the design was that not only was the CPU being cooled, but the Northbridge as well. An extra metal slab made contact with the NB chip, keeping it cooler, and thus more stable during overclocking. The entire heatsink/fan combo is held down by two clips, one on either end of the unit, and even in these constrained corners it was very easy to clamp down or release.
Off of the right side of the CPU were two memory slots supporting a total of 2GB of DDR400 RAM and to the left a single PCI and AGP 3.0 slot, with the AGP on the far side as opposed to being the innermost slot on a typical motherboard. This allows for better air-cooling of the video card, as there are slots along the sides of the chassis to allow air in and out. We had two concerns with this setup, however, one of which can be seen in the last photo above. The first problem we encountered when setting up our system using a GeForce 5900XT video card from BFG was that we simply had no way to power the card. There were only two MOLEX connections coming off of the power supply unit, so we were left with either connecting a CD-ROM drive or the video card. We wound up connecting the CD-ROM during installation with the on-board graphics providing the visuals, and then switched the cable over to the video card for testing. We opted not to use a power splitter, since one was not provided in the package. This is an oversight that should be corrected in future versions, as many newer video cards will require a separate power line. Our second gripe was with the placement of the cable that connects to the card reader. The top of the connector came just short of touching the capacitors on the video card. It could have been a recipe for disaster if we had snapped the card down, only to find two capacitors ripped off in the process.