Alienware Aurora R3 System Autopsy
Overall Design & Layout
Part of what separates an Alienware machine from other boutique systems is the unique chassis, though according to Alienware, it's not just about aesthetics. This year's Aurora model sports an enclosure purportedly "designed for easy upgrades and optimal thermal control."
;)
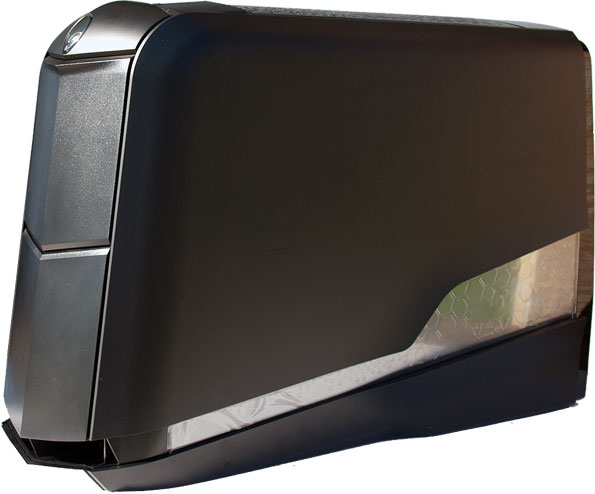
Weighing in at around 45 pounds and over two feet long, this isn't a mid-tower chassis designed for traveling LAN party goers. Once this thing lands in your home office/dorm room/bedroom or wherever you end up putting it, that's where it will likely stay. There aren't any wheels, straps, or handles that would indicate Alienware expects you to lug the Aurora R3 around.
The case itself is compromised of mostly plastic. We prefer aluminum, both for its weight and thermal characteristics, but we suppose the plastic design is one way Dell manages to keep costs from spiraling out of control. The plastic actually feels sturdy, and the Aurora R3 manages a menacing look without being overly obnoxious about it.

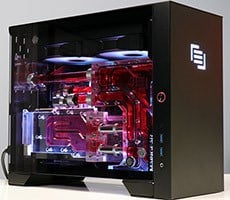
Dell hit a homerun in designing the side panel for the Aurora R3. To perform an autopsy, whether out of sheer curiosity or to upgrade your components, you remove the side panel by pulling on a latch on the top-rear of the case. This releases the Aurora R3's grip on the side panel, which you can then pull back and toss to the side. Putting it back on is just a matter of lining up the bottom and pushing the panel back into place. So how does the Aurora R3's ribcage light up if there aren't any wires running from the system to the side panel? Dell equipped it with a remote module that makes contact with the lighting system when the side panel is put back in place.
Both Radeon HD 6950 cards are hidden behind a plastic shroud that swings open, should you need to access them for any reason. Everything is a tight fit inside the Aurora R3, but upgrading couldn't be any easier. Want to add another hard drive? Simply slide out the tool-less drive tray, plop in your HDD, shove it back in and plug in the power and SATA cables Dell thoughtfully left hanging by the drive bay. Each of the drive bays have the necessary cables in place so you won't have to fumble around looking for the right wires.
That's the good. And the bad? Well, our system arrived with the main 24-pin ATX connector swinging in the wind. This is one of the first things you should check if your system doesn't fire up when hitting the power button, but can still prove vexing for less experienced PC users. Much more troubling was the discovery of a loose screw floating around. It was rattling around when we picked up the system, but had we not noticed it, could have shorted the system, or even worse, fried the hardware. Not cool.
The case itself is compromised of mostly plastic. We prefer aluminum, both for its weight and thermal characteristics, but we suppose the plastic design is one way Dell manages to keep costs from spiraling out of control. The plastic actually feels sturdy, and the Aurora R3 manages a menacing look without being overly obnoxious about it.
;) |
;) |
;) |
Hidden behind the front door are the optical drive(s) and media card reader. You access these by pressing the Alien head, which we initially thought would power up the system, and so will most people who don't RTFM. Instead, the power button sits somewhat stealthily on top behind the head.
The rear I/O panel is home to two USB 3.0 ports, six USB 2.0 ports, a Firewire port, GbE LAN port, 7.1 HD audio ports with THX TruStudio Sound, digital optical and coaxial SPDIF outputs, and an eSATA 3Gbps port. There's also a lock switch on top to keep the side panel secure, and a diagnostic button on the power supply.
The rear I/O panel is home to two USB 3.0 ports, six USB 2.0 ports, a Firewire port, GbE LAN port, 7.1 HD audio ports with THX TruStudio Sound, digital optical and coaxial SPDIF outputs, and an eSATA 3Gbps port. There's also a lock switch on top to keep the side panel secure, and a diagnostic button on the power supply.
;)
Dell provides two more USB 2.0 ports on the front panel, along with a single USB 3.0 port and both microphone and headphone ports. These are hidden behind a top panel door that you access by pressing down, and while we appreciate the option of keeping them out of sight, the angle is a bit awkward from a usability standpoint.
;)
Dell hit a homerun in designing the side panel for the Aurora R3. To perform an autopsy, whether out of sheer curiosity or to upgrade your components, you remove the side panel by pulling on a latch on the top-rear of the case. This releases the Aurora R3's grip on the side panel, which you can then pull back and toss to the side. Putting it back on is just a matter of lining up the bottom and pushing the panel back into place. So how does the Aurora R3's ribcage light up if there aren't any wires running from the system to the side panel? Dell equipped it with a remote module that makes contact with the lighting system when the side panel is put back in place.
Both Radeon HD 6950 cards are hidden behind a plastic shroud that swings open, should you need to access them for any reason. Everything is a tight fit inside the Aurora R3, but upgrading couldn't be any easier. Want to add another hard drive? Simply slide out the tool-less drive tray, plop in your HDD, shove it back in and plug in the power and SATA cables Dell thoughtfully left hanging by the drive bay. Each of the drive bays have the necessary cables in place so you won't have to fumble around looking for the right wires.
That's the good. And the bad? Well, our system arrived with the main 24-pin ATX connector swinging in the wind. This is one of the first things you should check if your system doesn't fire up when hitting the power button, but can still prove vexing for less experienced PC users. Much more troubling was the discovery of a loose screw floating around. It was rattling around when we picked up the system, but had we not noticed it, could have shorted the system, or even worse, fried the hardware. Not cool.