CyberPowerPC Zeus Mini-I 780 SFF Gaming PC Review
Design and Layout
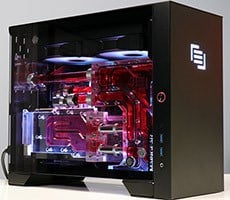
The CyberPowerPC Zeus Mini-I 780’s chassis is cool without coming off as too flashy. It’s black metal all the way around except for the black plastic front panel and the neon green grills on the two side panels. These, as well as grill designs on the top, bottom, and back of the chassis aid in heat dissipation while contributing to the overall look of the case.
The company included a black plastic stand for the Zeus Mini-I 780, and although it’s nice to have accessories, we’re not sure it’s entirely necessary; the system stands up just fine on its own, with no balance problems of any kind. We suppose the extra stability couldn’t hurt though, especially if it’s at a LAN party and an adjacent player gets wild after consuming a little too much Mt. Dew.

The Zeus Mini-I 780 boasts a tasteful green lighting setup that perfectly complements the neon green grills. The side fan lights up brightly, and the power button and front transparent slits get the same treatment. It’s just enough to impress without being ostentatious.

It is true that CyberPowerPC used off-the-shelf parts, so that’s a great start. If you want a new graphics card, processor, cooling system, or what have you, you can just buy a new one. The question is how easy is or isn’t it to get to those parts?
One annoying bit right off the bat is that the PSU on/off switch is not readily accessible. There’s an adapter mounted on the back panel for the power cord, but the actual PSU is all the way in the front of the case. Thus, if you want to flip the PSU power switch on or off, you have to remove the front panel to do so.
That said, there’s a good reason for the PSU to be pushed back that far: It allows much easier access to the motherboard, RAM and CPU socket. You still have to remove a side fan to get that access, but otherwise there aren’t really any impediments. With the side fan removed, you can also access all the cables that are connected to the motherboard--power cables, front panel headers, fan headers, WiFi module, and so on.
If you need to remove the motherboard itself, you’ll have to spend some time taking off some of the chassis brackets, which is held in place by four screws, but otherwise you can adjust most of what you need to on the motherboard simply by removing that side fan.
You may be wondering how exactly CyberPowerPC managed to squeeze a 4.25-inch tall graphics card into a chassis that only measures 4.4 inches in depth, and the answer is that they used a riser adapter that plugs the GPU in at 90 degrees, parallel to the motherboard.
It’s a very clever way of managing the space, but the major drawback is that it’s difficult to remove the thing. In fact, we don’t think you can take it out without removing the cooling system’s radiator, which is by no means especially difficult, but it is four more screws and another part hanging out of the chassis while you fiddle with the GPU.
Even so, those frustrations are minor and for that matter are to be expected in really any SFF rig. However, the near impossibility of accessing the storage drives is another matter.
CyberPowerPC securely mounted the 120GB SSD and 2TB HDD in the same drive cage, but the drive cage itself affords no access to the user without a great deal of effort. This is the process: First, you have to remove the side panel (1 screw) and the front panel; next, off comes the radiator (4 screws), which you must gently shove back so that you can fit a tiny precision screwdriver into the space in order to remove the optical drive (3 screws).
That’s right--the optical drive has to come all the way out and be disconnected from its cable. Then, you must take out all the screws holding the drive cage to the chassis frame (another 6 screws).
At this point, with a growing pile of fasteners, your ordeal is far from over. You have a few courses of action, none of which are particularly convenient. You can try to remove two of the cross members of the chassis frame, which was our first option.
Option number two would involve pulling out the graphics card and rotating the drive cage 90 degrees inside the chassis, but--alas, you’d have to remove the cooling radiator in its entirety first, and to do that you’d need to remove that pesky cross member.
A third option would mean pulling out the PSU and dropping the cage down into that vacated space. Or at the least, you could perhaps use that space to try and get at the SATA and power cables and screws and remove or replace the drives that way.
In sum, it’s extremely easy to access most of the system’s goodies; there are a couple of minor difficulties that we’ll chalk up to the facts of life with an SFF; but it’s difficult to get to the storage drives without disassembling half the system, and that’s a significant hurdle.
All the above said, note that CyberPowerPC’s cabling is quite good. There’s also no bloatware to speak of, which is another welcome plus.
Let’s cram these parts back into the Zeus Mini’s chassis and get down to the business of benchmarking this thing to see how it can fly.
The company included a black plastic stand for the Zeus Mini-I 780, and although it’s nice to have accessories, we’re not sure it’s entirely necessary; the system stands up just fine on its own, with no balance problems of any kind. We suppose the extra stability couldn’t hurt though, especially if it’s at a LAN party and an adjacent player gets wild after consuming a little too much Mt. Dew.
;)
The Zeus Mini-I 780 boasts a tasteful green lighting setup that perfectly complements the neon green grills. The side fan lights up brightly, and the power button and front transparent slits get the same treatment. It’s just enough to impress without being ostentatious.
;)
The front panel houses the slim optical drive, the power button, and some slick-looking lights, with two USB ports and audio jacks parked off to the side. The back panel has DVI-I, DVI-D, HDMI, and DisplayPort courtesy of the GeForce GTX 780 GPU, as well as a PS/2 port, two USB 2.0, four USB 3.0, DVI, two HDMI, and dual Ethernet ports. There are also two connectors for the included WiFi antenna as well as five audio jacks and S/PDIF.
As we mentioned earlier, CyberPowerPC is touting the Zeus Mini’s upgradability as a selling point, so we spent some time elbow deep (well, wrist deep, as this is a small chassis) in the machine to see how easy it is to access and swap out components.;)
It is true that CyberPowerPC used off-the-shelf parts, so that’s a great start. If you want a new graphics card, processor, cooling system, or what have you, you can just buy a new one. The question is how easy is or isn’t it to get to those parts?
;)
;)
;)
;)
That said, there’s a good reason for the PSU to be pushed back that far: It allows much easier access to the motherboard, RAM and CPU socket. You still have to remove a side fan to get that access, but otherwise there aren’t really any impediments. With the side fan removed, you can also access all the cables that are connected to the motherboard--power cables, front panel headers, fan headers, WiFi module, and so on.
;)
You may be wondering how exactly CyberPowerPC managed to squeeze a 4.25-inch tall graphics card into a chassis that only measures 4.4 inches in depth, and the answer is that they used a riser adapter that plugs the GPU in at 90 degrees, parallel to the motherboard.
;)
It’s a very clever way of managing the space, but the major drawback is that it’s difficult to remove the thing. In fact, we don’t think you can take it out without removing the cooling system’s radiator, which is by no means especially difficult, but it is four more screws and another part hanging out of the chassis while you fiddle with the GPU.
;)
CyberPowerPC securely mounted the 120GB SSD and 2TB HDD in the same drive cage, but the drive cage itself affords no access to the user without a great deal of effort. This is the process: First, you have to remove the side panel (1 screw) and the front panel; next, off comes the radiator (4 screws), which you must gently shove back so that you can fit a tiny precision screwdriver into the space in order to remove the optical drive (3 screws).
That’s right--the optical drive has to come all the way out and be disconnected from its cable. Then, you must take out all the screws holding the drive cage to the chassis frame (another 6 screws).
;)
;)
;)
At this point, with a growing pile of fasteners, your ordeal is far from over. You have a few courses of action, none of which are particularly convenient. You can try to remove two of the cross members of the chassis frame, which was our first option.
Option number two would involve pulling out the graphics card and rotating the drive cage 90 degrees inside the chassis, but--alas, you’d have to remove the cooling radiator in its entirety first, and to do that you’d need to remove that pesky cross member.
;)
A third option would mean pulling out the PSU and dropping the cage down into that vacated space. Or at the least, you could perhaps use that space to try and get at the SATA and power cables and screws and remove or replace the drives that way.
In sum, it’s extremely easy to access most of the system’s goodies; there are a couple of minor difficulties that we’ll chalk up to the facts of life with an SFF; but it’s difficult to get to the storage drives without disassembling half the system, and that’s a significant hurdle.
;)
Let’s cram these parts back into the Zeus Mini’s chassis and get down to the business of benchmarking this thing to see how it can fly.