MSI Z87 Motherboard Roundup: Rockin Haswell
UEFI and Overclocking
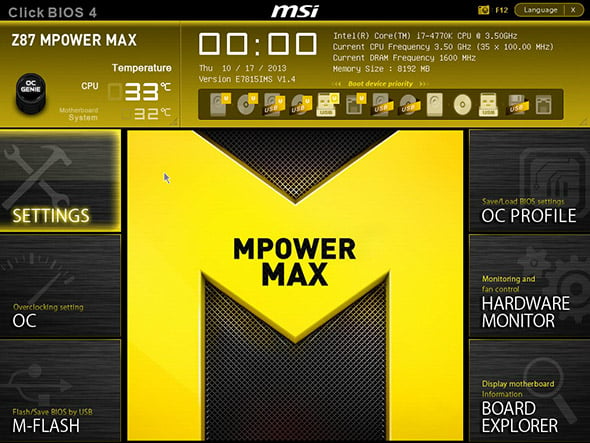
MSI’s UEFI BIOS is fairly straightforward in that there are just six sections to concern yourself with: Settings, OC (overclocking settings), M-Flash, OC Profile, Hardware Monitor, and Board Explorer.
In the Settings area, you can check your system status, adjust boot settings, save your work and reboot, and more. M-Flash is simply a tool to flash the BIOS (or save it to storage). OC Profile is a place to load an overclocking profile from a USB flash drive or save one that you’ve created within the UEFI. The Hardware Monitor area is self-explanatory, but it offers a great deal of data on fan speeds, temps, and voltages. One area that seems to be just a bone thrown to less experienced users is Board Explorer, which offers an interactive image of the motherboard; you can click on various highlighted board components to get more information about them.

Top: MPOWER Max; L to R, Z87I and Z87-G34 Gaming
Of course, the OC area is where most of the action is. MSI has provided plenty of adjustable settings for the CPU, DRAM, and more in this area, but not so many that your mind will explode. The company has struck a solid balance here between offering enough features for the discerning overclocker without overloading the user with endless parameters to nitpick.
On the main screen, there’s a good bit of data on display, and it’s essentially what most manufacturers opt to show, including CPU and motherboard temps, the time and date, which BIOS version you have, some basic system info, and boot device priority info. It’s interesting to note that MSI apparently decided against having an “Advanced” and a “Basic” UEFI; that setup is somewhat common, but we’re not complaining that MSI is only giving users one BIOS to look at. It just seems simpler.
MSI also gets a nod for having such a mature, stable UEFI. It’s fluid and responsive enough that you forget you aren’t just using some piece of Windows software, and there’s not much in the way of extra visual gobbledy-gook to clutter it up or slow things down.
Each of the three families of MSI Z87 motherboards has its own UEFI skin. The mainstream boards are blue-themed, the gaming boards red (with that killer dragon art), and the POWER boards yellow.
Unlike others in the market, the MSI boards we tested didn’t have a lot in the way of physical buttons for on-board overclocking controls. The exception in the trio we looked at was the Z87 MPOWER Max, which has an OC Genie button and DirectOC +/- buttons. In all cases, though, we used the UEFI to adjust our overclocking settings as opposed to physical buttons or Windows-based software.
For the purposes of this article, we kept things simple, working with just the BCLK and CPU multiplier to see what these boards would let us do. We also used an aftermarket dual-fan cooler (Corsair A70) as opposed to a liquid cooling system.
On their own, the overclocking results seem solid enough. The two bigger boards delivered identical performance of 4.6GHz with a BLCK of 100MHz and x46 multiplier, while the little Z87I mustered 4.4GHz (BLCK 100MHz, multiplier x44). Much of anything we tried beyond that, including increasing the BCLK a smidgen, resulted in a BSOD.
Compared to the ASUS and Gigabyte Z87 motherboards we’ve recently tested, this isn’t a particularly strong performance. The Gigabyte boards couldn’t get past a x46 multiplier either, but we were able to push the BCLK on all three boards at x46 at least a little bit, and the ASUS motherboards all made it into 4.7GHz range before coughing up a hairball.
However, all three MSI boards hit their max overclocks while keeping temperatures relatively low. And of course, you could get more out of these mainboards with more time, patience, and liquid cooling.
In the Settings area, you can check your system status, adjust boot settings, save your work and reboot, and more. M-Flash is simply a tool to flash the BIOS (or save it to storage). OC Profile is a place to load an overclocking profile from a USB flash drive or save one that you’ve created within the UEFI. The Hardware Monitor area is self-explanatory, but it offers a great deal of data on fan speeds, temps, and voltages. One area that seems to be just a bone thrown to less experienced users is Board Explorer, which offers an interactive image of the motherboard; you can click on various highlighted board components to get more information about them.
;)
;)
;)
Top: MPOWER Max; L to R, Z87I and Z87-G34 Gaming
Of course, the OC area is where most of the action is. MSI has provided plenty of adjustable settings for the CPU, DRAM, and more in this area, but not so many that your mind will explode. The company has struck a solid balance here between offering enough features for the discerning overclocker without overloading the user with endless parameters to nitpick.
;)
On the main screen, there’s a good bit of data on display, and it’s essentially what most manufacturers opt to show, including CPU and motherboard temps, the time and date, which BIOS version you have, some basic system info, and boot device priority info. It’s interesting to note that MSI apparently decided against having an “Advanced” and a “Basic” UEFI; that setup is somewhat common, but we’re not complaining that MSI is only giving users one BIOS to look at. It just seems simpler.
;)
;)
MSI also gets a nod for having such a mature, stable UEFI. It’s fluid and responsive enough that you forget you aren’t just using some piece of Windows software, and there’s not much in the way of extra visual gobbledy-gook to clutter it up or slow things down.
;)
;)
Each of the three families of MSI Z87 motherboards has its own UEFI skin. The mainstream boards are blue-themed, the gaming boards red (with that killer dragon art), and the POWER boards yellow.
Overclocking
Unlike others in the market, the MSI boards we tested didn’t have a lot in the way of physical buttons for on-board overclocking controls. The exception in the trio we looked at was the Z87 MPOWER Max, which has an OC Genie button and DirectOC +/- buttons. In all cases, though, we used the UEFI to adjust our overclocking settings as opposed to physical buttons or Windows-based software.
For the purposes of this article, we kept things simple, working with just the BCLK and CPU multiplier to see what these boards would let us do. We also used an aftermarket dual-fan cooler (Corsair A70) as opposed to a liquid cooling system.
On their own, the overclocking results seem solid enough. The two bigger boards delivered identical performance of 4.6GHz with a BLCK of 100MHz and x46 multiplier, while the little Z87I mustered 4.4GHz (BLCK 100MHz, multiplier x44). Much of anything we tried beyond that, including increasing the BCLK a smidgen, resulted in a BSOD.
Compared to the ASUS and Gigabyte Z87 motherboards we’ve recently tested, this isn’t a particularly strong performance. The Gigabyte boards couldn’t get past a x46 multiplier either, but we were able to push the BCLK on all three boards at x46 at least a little bit, and the ASUS motherboards all made it into 4.7GHz range before coughing up a hairball.
However, all three MSI boards hit their max overclocks while keeping temperatures relatively low. And of course, you could get more out of these mainboards with more time, patience, and liquid cooling.


